# Welcome to Gooey.AI Academy

Welcome to Gooey.AI Academy, learn and master the latest AI Workflows for Impact, Creativity and Productivity. Designed for product managers, impact professionals, and technical professionals. We offer step-by-step guides to AI Copilots and associated AI Workflows so you can build AI Solutions in days, not months!&#x20;

### Featured Courses

<table data-card-size="large" data-view="cards" data-full-width="false"><thead><tr><th></th><th data-hidden data-card-cover data-type="image">Cover image</th><th data-hidden></th><th data-hidden data-card-target data-type="content-ref"></th></tr></thead><tbody><tr><td><strong>GOOEY.AI FOR IMPACT</strong></td><td><a href="https://2450152260-files.gitbook.io/~/files/v0/b/gitbook-x-prod.appspot.com/o/spaces%2FNWqgWAjD0VVJgjYDpsN5%2Fuploads%2FQFr4SsgNEI4AUGJEqIrB%2Faiforimpact.png?alt=media&amp;token=a0fce9ce-a50e-4e59-8c33-6de7eabc2889">aiforimpact.png</a></td><td></td><td><a href="/ai-for-impact/module-1">GOOEY.AI FOR IMPACT</a></td></tr><tr><td><strong>GOOEY.AI FOR CREATIVES</strong></td><td><a href="https://2450152260-files.gitbook.io/~/files/v0/b/gitbook-x-prod.appspot.com/o/spaces%2FNWqgWAjD0VVJgjYDpsN5%2Fuploads%2FfsQsqjYHGkganWsByJlj%2Faiforcreatives.png?alt=media&amp;token=e104a14c-b50c-40af-ba9e-2e949d6af330">aiforcreatives.png</a></td><td></td><td><a href="/ai-for-creatives/intro-to-ai-for-creatives">GOOEY.AI FOR CREATIVES</a></td></tr><tr><td><strong>GOOEY.AI FOR PRODUCTIVITY</strong></td><td><a href="https://2450152260-files.gitbook.io/~/files/v0/b/gitbook-x-prod.appspot.com/o/spaces%2FNWqgWAjD0VVJgjYDpsN5%2Fuploads%2FP1phu38JTNFV0GJb6HEk%2Faiforprod.png?alt=media&amp;token=f3ca34cb-57d6-45b9-9b18-503fb1a38b4c">aiforprod.png</a></td><td></td><td><a href="/ai-for-productivity/intro-to-ai-for-productivity">GOOEY.AI FOR PRODUCTIVITY</a></td></tr></tbody></table>


# Using Gooey.AI Workspaces

{% embed url="<https://youtu.be/kntQc0450b0>" %}

Workspaces are very useful when working in teams. With workspaces, you can:&#x20;

1. Collaborate on saved workflows
2. Access the [Version History](https://docs.gooey.ai/guides/how-to-use-workspaces/how-to-use-version-history) of saved workflows (with comments and the ability to revert to the previous version)
3. Share payment methods (so you can cover the Gooey usage cost for your team members)
4. Assign roles and access levels for team members
5. Shared API secrets (to securely access private APIs)
6. Manage multiple teams independently, each with their own billing details and saved workflows

If you are already added to a Workspace, you should be able to see it in the drop-down on the top right:&#x20;

<figure><img src="https://2450152260-files.gitbook.io/~/files/v0/b/gitbook-x-prod.appspot.com/o/spaces%2FNWqgWAjD0VVJgjYDpsN5%2Fuploads%2FahK2e6DPyD9MbSGc9927%2FScreenshot%202025-05-05%20at%204.17.35%E2%80%AFPM.png?alt=media&amp;token=74e264e6-48c6-4152-9a8e-93640bc6e091" alt=""><figcaption></figcaption></figure>

Tabs of Workspaces

* **Members** - view and adjust all your member invites and member rights&#x20;

<div data-full-width="true"><figure><img src="https://2450152260-files.gitbook.io/~/files/v0/b/gitbook-x-prod.appspot.com/o/spaces%2FNWqgWAjD0VVJgjYDpsN5%2Fuploads%2FSa1HaVtERYsF0HCJlpg7%2FScreenshot%202025-05-05%20at%204.22.37%E2%80%AFPM.png?alt=media&amp;token=6902be0f-3fb4-4132-9a50-5170adbadb7e" alt=""><figcaption></figcaption></figure></div>

* **Saved** - view all your saved workflows here

<figure><img src="https://2450152260-files.gitbook.io/~/files/v0/b/gitbook-x-prod.appspot.com/o/spaces%2FNWqgWAjD0VVJgjYDpsN5%2Fuploads%2Fp1KwboeiJF1HgI7e6WsW%2FScreenshot%202025-05-05%20at%204.22.51%E2%80%AFPM.png?alt=media&amp;token=bacfd1da-a3dd-428e-ac75-ff719dd22c19" alt=""><figcaption></figcaption></figure>

* **API Keys** - save all your API keys here

<figure><img src="https://2450152260-files.gitbook.io/~/files/v0/b/gitbook-x-prod.appspot.com/o/spaces%2FNWqgWAjD0VVJgjYDpsN5%2Fuploads%2FNSuv0Utd2vZuLodEGlJp%2FScreenshot%202025-05-05%20at%204.23.16%E2%80%AFPM.png?alt=media&amp;token=329d6f21-dc70-42b3-96d8-cbb02374c144" alt=""><figcaption></figcaption></figure>

## How to add team members?&#x20;

If you are an Admin or an Owner you can add team members by clicking the Invite button in the [Manage Workspace>Members](https://gooey.ai/workspaces/members/) section.&#x20;

<figure><img src="https://2450152260-files.gitbook.io/~/files/v0/b/gitbook-x-prod.appspot.com/o/spaces%2FNWqgWAjD0VVJgjYDpsN5%2Fuploads%2F9A4mTmu8o1ZpR9blDLmK%2FScreenshot%202025-06-08%20at%205.07.42%E2%80%AFPM.png?alt=media&amp;token=503bcf46-0029-4146-9c44-c29374210dd9" alt=""><figcaption></figcaption></figure>

<figure><img src="https://2450152260-files.gitbook.io/~/files/v0/b/gitbook-x-prod.appspot.com/o/spaces%2FNWqgWAjD0VVJgjYDpsN5%2Fuploads%2Fwy5FRnFjaq8paqIVr4MI%2FScreenshot%202025-06-08%20at%205.07.52%E2%80%AFPM.png?alt=media&amp;token=b9137423-8af5-4ed3-850b-668b4d6e792e" alt=""><figcaption></figcaption></figure>

<figure><img src="https://2450152260-files.gitbook.io/~/files/v0/b/gitbook-x-prod.appspot.com/o/spaces%2FNWqgWAjD0VVJgjYDpsN5%2Fuploads%2F9Olur7z47InKRcc71axL%2FScreenshot%202025-06-08%20at%205.07.55%E2%80%AFPM.png?alt=media&amp;token=df37f325-f319-43d6-8644-53bfb485150b" alt=""><figcaption></figcaption></figure>

**Learn more about Workspaces:**

<table data-view="cards"><thead><tr><th></th><th data-hidden data-card-target data-type="content-ref"></th></tr></thead><tbody><tr><td>How to use Version History?</td><td><a href="https://docs.gooey.ai/guides/how-to-use-workspaces/how-to-use-version-history">https://docs.gooey.ai/guides/how-to-use-workspaces/how-to-use-version-history</a></td></tr><tr><td>How to add SECRETS in your Workspaces?</td><td><a href="https://docs.gooey.ai/tools/how-to-use-gooey-functions/how-to-use-secrets-in-functions">How to use SECRETS in Functions?</a></td></tr></tbody></table>


# Intro to AI for Impact

{% embed url="<https://youtu.be/PQKtZ890bAc>" %}

Welcome! This guide will provide an overview of the core concepts behind building generative AI Agent using Gooey.AI, and outline the components and workflow involved in setting up, testing, and deploying your own AI assistant.

### What we'll cover:

* Understanding Large Language Models (LLMs)
* Introduction to Retrieval Augmented Generation (RAG)
* The Role of Vector Databases (VectorDB)
* Speech-to-Text and Text-to-Speech Overview
* Building and Deploying Your AI Agent
* Using Knowledge Bases and Tools
* Evaluation and Observability

***

### 1. Core Concepts

#### Large Language Models (LLMs)

LLMs, such as GPT-4, are AI models trained to generate natural language responses to user queries. They work by taking user input (e.g., “What is the capital of India?”) and generating an answer. However, LLMs can sometimes produce incorrect answers (hallucinations) if they lack relevant training data.

#### Retrieval Augmented Generation (RAG)

RAG enhances LLMs by integrating external knowledge sources:

* User queries are matched against an indexed knowledge base (documents, PDFs, web pages, etc.).
* Relevant snippets are retrieved and summarized by the LLM to form an accurate response.
* This is akin to an “open book exam,” allowing the AI to reference source material for answers.

<figure><img src="https://2450152260-files.gitbook.io/~/files/v0/b/gitbook-x-prod.appspot.com/o/spaces%2FNWqgWAjD0VVJgjYDpsN5%2Fuploads%2Fyne6j9hEQcOsrOZHgYiq%2FCopilot%20Session.png?alt=media&amp;token=a5c9f4fb-53d9-4472-8745-8f040fc456bb" alt=""><figcaption></figcaption></figure>

#### Vector Databases (VectorDB)

A VectorDB indexes and stores document “embeddings”—numerical representations that map semantic similarity between pieces of text. For example, the word “bunny” is represented by its proximity to related concepts, allowing for smarter information retrieval.

***

### 2. Speech and Language Processing

* **Speech-to-Text:** Converts user audio inputs into transcribed text using models like Google Speech, Azure, Deepgram, Whisper (open source), or regional APIs like Bhashini.
* **Text-to-Speech:** Converts AI-generated text responses back into audio, allowing users to hear the answers.
* **Translation & Lip Sync:** Supports multilingual scenarios by translating answers and optionally generating video avatar responses.

***

### 3. AI Agent Interaction Flow

Typical flow for a AI Agent:

1. User submits a query (text, voice, or image).
2. AI Agent searches the knowledge base for relevant information (including conversation history, if applicable).
3. LLM synthesizes a response, optionally calling special functions/tools or APIs as needed (tool calling).
4. The answer is returned in text, audio, and/or video format, translated as required.

<figure><img src="https://2450152260-files.gitbook.io/~/files/v0/b/gitbook-x-prod.appspot.com/o/spaces%2FNWqgWAjD0VVJgjYDpsN5%2Fuploads%2FOg0sRgUgpmgEe1rz0iFA%2FCopilot%20Session%20(2).png?alt=media&amp;token=188f37cc-cc43-43f0-b930-e18be63fd8d2" alt=""><figcaption></figcaption></figure>

<figure><img src="https://2450152260-files.gitbook.io/~/files/v0/b/gitbook-x-prod.appspot.com/o/spaces%2FNWqgWAjD0VVJgjYDpsN5%2Fuploads%2FFInNXtepI3fgXvoyLvko%2FCopilot%20Session%20(4).png?alt=media&amp;token=08c0635f-4271-441a-842f-b02354130276" alt=""><figcaption></figcaption></figure>

***

### 4. Tools, APIs, and Customization

* Choose appropriate models/APIs for each component (e.g., open source or commercial options for speech, embedding, translation, etc.).
* Configure tool calling for simple code-based functions or external API/database access, supporting “agentic” LLM behavior.

***

### 5. Deployment and Evaluation

* Deploy AI Agent via channels like web, WhatsApp, or IVR.
* Use built-in evaluation and observability tools to monitor AI Agent performance, ensure answer accuracy, and analyze user interactions.

***

### 6. Getting Started

To set up a AI Agent:

1. **Select language and speech models** for input processing.
2. **Upload and index your knowledge base** (documents, PDFs, CSVs, etc.).
3. **Configure your LLM and give it appropriate instructions**.
4. **Integrate tools/APIs** as needed for additional functionality.
5. **Set up output options** (text-to-speech, avatars, etc.).
6. **Deploy and monitor** your AI Agent through your chosen channels.

Throughout this documentation, you will find detailed modules explaining each step, with practical guides and demos to help you build, test, and refine your own generative AI Agent.

<figure><img src="https://2450152260-files.gitbook.io/~/files/v0/b/gitbook-x-prod.appspot.com/o/spaces%2FNWqgWAjD0VVJgjYDpsN5%2Fuploads%2FFPjQrxBEUQg1rG8G1YBu%2FCopilot%20Session%20(3).png?alt=media&amp;token=0b5f44d1-501f-4b5c-8742-9fa323e66220" alt=""><figcaption></figcaption></figure>


# How does Gooey.AI Agent Builder work?

{% embed url="<https://youtu.be/4wGKQAGUm48>" %}

* **Instructions**: Write your LLM Prompt here
* **Language Model**: Choose your Language Model here
* **Knowledge Base**: Add your expert knowledge documents here. These can be in PDF, Google Drive, Excel, Word Doc, OneDrive formats&#x20;
* **Capabilities**: Enhance your AI Agent with Speech Recognition, Text-to-Speech, and Translation capabilities&#x20;
* **Chatbot Preview**: Test your AI Agent in the Preview section

<figure><img src="https://2450152260-files.gitbook.io/~/files/v0/b/gitbook-x-prod.appspot.com/o/spaces%2FNWqgWAjD0VVJgjYDpsN5%2Fuploads%2F2lUnFUzbwDhYjGdqzpRI%2Fshapes%20at%2025-05-07%2018.02.33.png?alt=media&amp;token=6f917513-e821-4755-94c0-365a12bfd71e" alt=""><figcaption></figcaption></figure>

Other Tabs

* **Examples:** All published examples are here
* **API:** A pre-populated API code snippet for your AI Agent is here
* **History**: All runs for the AI Agent saved in your Workspace are here. These include all the test runs from the AI Agent Builder and API calls.&#x20;
* **Saved**: All your saved AI Agent workflows are here; you have the option to make them private or public
* **Integrations:** Start deploying your AI Agent from the Deploy Tab

<figure><img src="https://2450152260-files.gitbook.io/~/files/v0/b/gitbook-x-prod.appspot.com/o/spaces%2FNWqgWAjD0VVJgjYDpsN5%2Fuploads%2F40gurXl4hECLq9q80hfW%2FScreenshot%202025-11-07%20at%206.53.45%E2%80%AFPM.png?alt=media&amp;token=ce4c0fd8-112f-42be-9463-16cb019b1bd2" alt=""><figcaption></figcaption></figure>


# Set your KPI and Metrics

Points to consider when building your KPIs

1. Collect a few clear set of assumptions from the Theory of Change model.&#x20;

EG: For the Farmer.chat, a core KPI was: How have smallholder farmers' earnings improved after using the AI copilot?

2. Other KPIs could include:&#x20;
3. Is the Copilot performing well, ie, its able to generate good answers
4. Is the Copilot successfully answering the questions (is it not answering at all)
5. What is the feedback you are getting from the user (just 👍and 👎)
6. What is the retention for the Copilot?
7. What are the topic-based differences?&#x20;
8. What’s missing?
9. Language detection and rate keeping
10. Utilization of specific information
11. Outbound referrals to departments
12. Operators


# Bring Your Golden Q\&A

The Golden Q\&A pair helps to test&#x20;

* Various prompt tweaks to improve the AI Agent's responses&#x20;
* Compare LLM models
* Compare audio speech, recognition and, text-to-speech models
* Check price and latency
* Monitor regression

With the help of our Bulk and Evaluation Workflows, you can test the AI Agent quickly against a Q\&A set.&#x20;

### Create your Golden Q\&A pair <a href="#id-4y2kttei07z1" id="id-4y2kttei07z1"></a>

Prepare your golden QnA set:

1. Create a list of the most frequently asked questions for your AI Agent (we recommend between 25 for optimum observability and regression you can do more if you prefer)
2. Make sure the Excel sheet/Google Sheets table has a “header” section
3. Add all your questions and golden answers in the column below it

<figure><img src="https://2450152260-files.gitbook.io/~/files/v0/b/gitbook-x-prod.appspot.com/o/spaces%2FNWqgWAjD0VVJgjYDpsN5%2Fuploads%2FK71YxBndKpfbYOO5JxKK%2F10.png?alt=media&amp;token=f920c12e-32a5-4881-9f79-353fc5a80b7b" alt="" width="563"><figcaption></figcaption></figure>

> **An expert must provide the Golden Answers, these can't be synthetic answers.**&#x20;

#### Common terms <a href="#id-3yvzoyislzdo" id="id-3yvzoyislzdo"></a>

* **Golden Answer**: Most suitable and accurate answers provided by humans with expertise on the subject
* **Semantic Closeness**: Since LLM will not output the same answer every time, the evaluation will check for how semantically close the output of the LLM is to your “Golden Answer”
* **Score and Rank**: For each generated answer the Evaluation workflow will give a “score” between 0 and 1, and rank the best answer.
* **Reasoning**: Evaluation LLM will share a short "reasoning" of how the score was given
* **Chart**: Based on the aggregate score, the Evaluation workflow will create a comparison chart

## KNOWLEDGE BASE VS GOLDEN Q\&A

| Knowledge Base                                                                                                              | Golden Q\&A                                                                                                                                                                           |
| --------------------------------------------------------------------------------------------------------------------------- | ------------------------------------------------------------------------------------------------------------------------------------------------------------------------------------- |
| The Knowledge base is this entire set of structured and unstructured data that encompasses your agent’s field of expertise. | Golden Q\&A is a sample set of questions and answers. This is sample set includes questions most likely asked by user with an answer most accurately framed by an expert in your team |
| This includes all your web pages, PDFs, CSVs, Docs, and videos.                                                             | This is always a table with 4-5 columns with “Questions” and “Answers” as separate column headers.                                                                                    |
| Exists in your AI Agent Builder                                                                                             | Is meant to be used in the Bulk Evaluation Workflow (we will learn about it in Session 4)                                                                                             |
| Is used directly in your citations for the AI Agent's answers                                                               | Is only meant for testing your AI Agent’s accuracy                                                                                                                                    |
| Meant for answering external users questions                                                                                | Meant for checking regression, quality, time and cost internally                                                                                                                      |


# Bring your Knowledge Base

{% embed url="<https://youtu.be/vUJu7Lwqhlk>" %}

## Steps to follow

* Bring specific documents about your Organisation or field of work
* Add it to the "Knowledge" section&#x20;
* Test it on the AI Agent Builder with a relevant question from your Golden Q\&A set&#x20;

### Tips and tricks

* If you have a Google Drive or OneDrive account, you can copy the link of the folder instead of pasting document links individually.&#x20;
* If your documents are regularly updated, switch on the "Always Check for Updates" toggle.
* If your documents have a lot of diagrams and tables, it's advisable to use the "Create Synthetic Data" dropdown. This will extract your document page by page and provided extra synthesized data for every page, allow improved vector search.&#x20;


# Setting up your LLM Prompt

{% embed url="<https://youtu.be/W3Sq62lRBfE>" %}

## Basics of Prompt Instructions in Gooey.AI Agent

We'll use the example of creating a health bot that specializes in hypertension and blood pressure (BP), and we’ll walk through key prompting best practices.

### What is the “Instructions” Space?

The LLM prompt sets the foundation for your AI Agent's behavior. With the prompt you can:

* Define the AI Agent's role, scope&#x20;
* How it should respond to users
* Tone of voice

{% hint style="success" %}
Well-written instructions ensure your AI Agent stays on topic and serves its purpose.
{% endhint %}

### Step 1: Open or Create Your AI Agent

Start by opening an existing AI Agent or creating a new one. For this example, we’ll use a template called **Clean Slate Copilot**. You can choose any of the AI Agent from our [Examples Tab](https://gooey.ai/copilot/examples/) select it from the examples list.

### Step 2: Define Your Bot’s Persona and Scope

We want to build a **health bot** that:

* Focuses strictly on hypertension and BP.
* Assists doctors and healthcare providers.
* Refuses to answer unrelated questions.

In the instructions box, write:

{% code overflow="wrap" %}

```
You are a health bot. You focus on conversations around hypertension and blood pressure (BP). You are an assistant to doctors and healthcare providers.

Do not answer questions that are not related to hypertension and BP. If a user asks you an unrelated question, you must reply: "I am sorry, I can’t answer this question. I am here to assist you with hypertension and BP topics."
```

{% endcode %}

### Step 3: Add a Friendly Greeting

A welcoming tone encourages user engagement. Add to your instructions:

{% code overflow="wrap" %}

```
If a user greets you (for example, says "hi"), reply: "Hi, I'm HelpBot. I specialize in hypertension and BP education. How can I help you today?"
```

{% endcode %}

### Step 4: Testing Your AI Agent

Let’s verify that your AI Agent follows the instructions. We will ask two questions:&#x20;

1. Related to the Knowledge Base and the purpose of the AI Agent
2. Unrelated to the Knowledge Base and AI Agent's purpose

Try asking it an unrelated question, such as:

> What is the weather like in Udaipur in the summer?

You should see a response like:

> I am sorry, I can’t answer this question. I am here to assist you with hypertension and BP topics.

This confirms your bot is following its assigned scope.

### Why is This Important?

Clear instructions ensure your AI Agent stays focused, improving reliability, user trust, and the overall experience. For specialized domains like healthcare, it’s essential to avoid accidental misinformation by only handling relevant queries. &#x20;


# Jinja Templating

## Variables

When deploying an AI Agent, your API calls will typically consist of two types of content:

* **Fixed content** Static instructions or context that remain constant across multiple interactions
* **Variable content:** Dynamic elements that change with each request or conversation, such as:
  * User inputs
  * Retrieved content for Retrieval-Augmented Generation (RAG)
  * Conversation context such as user account history
  * System-generated data such as tool use results fed in from other independent calls to Claude

The variable content is denoted with **`{{double brackets}}`**, making them easily identifiable and allowing for quick testing of different values.

<figure><img src="https://2450152260-files.gitbook.io/~/files/v0/b/gitbook-x-prod.appspot.com/o/spaces%2FNWqgWAjD0VVJgjYDpsN5%2Fuploads%2FdJ8d4DmhCy4J3VwUKv2C%2FScreenshot%202025-05-15%20at%2012.51.59%E2%80%AFPM.png?alt=media&amp;token=6f32b4f0-0566-4627-8c68-b12061f00998" alt=""><figcaption></figcaption></figure>

<figure><img src="https://2450152260-files.gitbook.io/~/files/v0/b/gitbook-x-prod.appspot.com/o/spaces%2FNWqgWAjD0VVJgjYDpsN5%2Fuploads%2FPfkGNB9tDoOTXerF2I66%2FScreenshot%202025-01-02%20at%2012.48.16%E2%80%AFPM.png?alt=media&amp;token=dbdb3e26-14cb-4e02-bd54-8bad2261f0b7" alt=""><figcaption></figcaption></figure>

In the example below,  there is a JSON object with a `title` and `pageContent` that is passed to the LLM Prompt

{% code title="AI Prompt" overflow="wrap" %}

```
{% if pageJSON %}
# Inputs
pageJSON: {{ pageJSON }}
By default, assume that the subject of enquiry is {{ pageJSON.title }}. 
{% endif %}
```

{% endcode %}

{% code title="JSON Object as a Variable {{ pageJSON }}" %}

```json
{
  "title": "Deploy to WhatsApp",
  "pageContent": "<!DOCTYPE html>\n<html lang=\"en\">\n<head>\n  <meta charset=\"UTF-8\">\n  <title>Deploy to WhatsApp</title>\n</head>\n<body>\n  <h1>Deploy to WhatsApp</h1>\n  <p><strong>One-click integration for your AI Copilot</strong></p>\n\n  <h2>How to deploy on WhatsApp</h2>\n  <h3>Prerequisites</h3>\n  <ul>\n    <li>Verified Facebook business account</li>\n    <li>A new or spare phone number for the WhatsApp bot</li>\n  </ul>\n\n  <h3>Integration</h3>\n  <p>Click on the <a href=\"https://gooey.ai/copilot/integrations/\">Integrations tab</a> in the copilot workflow</p>\n  <ul>\n    <li>Use the \u201cWhatsApp\u201d button</li>\n    <li>You\u2019ll be redirected to Facebook Login Page</li>\n  </ul>\n\n  <blockquote>\n    <strong>NOTE:</strong> Gooey connects to a Facebook profile, not a Facebook Page. If you don\u2019t have access to the organization\u2019s Facebook profile, create a dedicated one.\n  </blockquote>\n\n  <ol>\n    <li><strong>Step 1:</strong> Fill Business Information</li>\n    <li><strong>Step 2:</strong> Choose your business account (or create a new one)</li>\n    <li><strong>Step 3:</strong> Add a phone number for your WhatsApp bot</li>\n    <li><strong>Step 4:</strong> Verify the phone number</li>\n  </ol>\n\n  <p><strong>YOUR BOT IS NOW READY!</strong></p>\n\n  <h3>Test</h3>\n  <p>You can test your bot by heading to the registered number!</p>\n\n  <h3>Share</h3>\n  <p>To share the link with others, share the number like this: <a href=\"https://wa.me/\">https://wa.me/&lt;number&gt;</a></p>\n\n  <h2>Frequently Asked Questions</h2>\n\n  <h3>Q: I have got a new number for the WhatsApp integration but it isn't working. What should I do?</h3>\n  <p>A: Avoid these mistakes:</p>\n  <ul>\n    <li>Activating the SIM on a smartphone with WhatsApp</li>\n    <li>Registering the phone number directly on Facebook</li>\n    <li>Registering the phone number on WhatsApp Manager</li>\n  </ul>\n  <p>You\u2019ll need to deactivate these before integrating with Gooey Copilot.</p>\n\n  <h3>Q: The integration worked successfully, but it's not working now. Why is this?</h3>\n  <p>A: After integration, do not use the number with a WhatsApp client. That breaks the bot integration.</p>\n\n  <h3>Q: The integration worked successfully, why did the bot stop working after the first day?</h3>\n  <p>A: Facebook requires a credit card on file to keep the number active. Even if they don\u2019t charge anything, it\u2019s necessary to pass their verification process.</p>\n\n  <h2>Need a WhatsApp Number?</h2>\n  <p>Upgrade to a business plan at <a href=\"https://gooey.ai/pricing\">https://gooey.ai/pricing</a></p>\n  <p>Or <a href=\"https://gooey.ai/contact\">book a sales call</a> if you have questions.</p>\n</body>\n</html>"
}
```

{% endcode %}

{% embed url="<https://gooey.ai/copilot/json-object-test-colgggewwvbo/>" %}
See the Example here
{% endembed %}

## Conditional statements

It is a common use-case that the same AI Agent example might be deployed/integrated on various platforms like SLACK, WHATSAPP, WEB and so on. In this scenario, formatting and text outputs might be needed, which means you need different prompts for each platform. With Jinja Templating, this issue is solved. You can use the prompt example below and tweak it as needed:

{% code title="if statement in prompts" overflow="wrap" %}

```
{% if platform in [ "WHATSAPP", "SLACK" ] %}
Remember, you are a {{ platform }} agent, so do not use HTML, latex or any other markup language, instead use only the following formatting styles: 
italic: single underscore
bold: single asterix. Do not use 2 asterix as per markdown, instead use {{ platform }} guidelines and use 1 asterix only
strikethrough: single tilde
code: single backtick
code block: 3 backticks
quoted text: place an angle bracket and space before the text
headings: just use bold style with 1 asterix.

{% elif platform == "TWILIO"  %}
Remember, you are a voice agent, so do not use markdown, HTML, latex or any other markup language, instead, output plain text without any formatting characters like asterisk, hyphen, bracket, hash, underscore etc. 
{% endif %}
```

{% endcode %}

{% embed url="<https://gooey.ai/copilot/>" %}


# Few shot instructions

In some scenarios, adding a few example conversations in the prompt is advisable to improve the outputs - this is called Few-Shot Prompting. This is useful when:

* The answers are too verbose, and you want to shorten the responses
* You want to ensure the answer is always the same with no changes

After adding the main prompt, you can add a few-shot examples, which reflect the kind of responses you want from the AI Agent, these could be useful to limit the answers to a certain length, maintain a brand-related tone, etc.

{% code overflow="wrap" %}

```
--- insert your project-relevant prompt above this line --- 
User: Give an accurate summary in ~100 words only to my questions. 
Assistant: Surely
User: Do you have a lipsync tool?
Assistant: Yes, Gooey.AI does have a Lipsync tool. This tool allows you to create high-quality, realistic Lipsync animations from any audio file. Here is the link to the tool: https://gooey.ai/Lipsync/ and here is the guide: https://gooey.ai/docs. Can I help with you with anything else?
User: How can i book a demo?
Assitant: To book a demo with Gooey.AI, you can visit: https://www.help.gooey.ai/contact#book-demo
```

{% endcode %}

{% embed url="<https://gooey.ai/copilot/marketing-gooeyai-support-bot-3dwfcqvcwl04/>" %}

See the full example here


# Tips for prompting based on LLM

| Feature / Style                 | OpenAI (GPT-4, GPT-3.5)                                                                  | LLaMA (LLaMA 2 & 3)                                                        | Mistral (Mistral 7B, Mixtral)                                            |
| ------------------------------- | ---------------------------------------------------------------------------------------- | -------------------------------------------------------------------------- | ------------------------------------------------------------------------ |
| **Role Structure**              | Uses `system`, `user`, and `assistant` roles explicitly                                  | No native role handling, but you can simulate it using text cues           | No role handling, but follows text cues and prompt templates             |
| **System Prompt Support**       | ✅ Full support — allows defining model behavior (e.g., `"You are a helpful assistant."`) | 🚫 No native support; must embed in user prompt manually                   | 🚫 No native support; simulate via prompt prefix                         |
| **Formatting Style**            | Natural conversation, JSON-compatible, markdown-friendly                                 | Structured, requires consistent formatting for few-shot and instruct modes | Concise and direct; works well with bullet lists, steps, or templates    |
| **Few-shot Learning**           | Highly effective with few-shot examples                                                  | Effective, especially with CodeLLaMA and LLaMA-Instruct variants           | Can benefit from few-shot, though prefers minimal examples               |
| **Chain-of-Thought Reasoning**  | Strong performance with "Let's think step by step" style prompts                         | Improves performance significantly with explicit CoT instructions          | Supports CoT well, especially in instruct-tuned variants                 |
| **Prompt Length Handling**      | Handles long prompts well (especially GPT-4-1 with large context windows)                | Medium capacity; recent models like LLaMA 3 support longer prompts         | Smaller context (e.g., 32K tokens), favors concise prompts               |
| **Fine-tuning Response Format** | Easily aligns to JSON, tables, and multi-part instructions                               | Needs more specificity to get consistent formatting                        | Consistent if given strict format constraints                            |
| **Use of Delimiters**           | Often uses `"""` or `###` to separate instructions from input                            | Suggested to separate examples and instructions clearly                    | Benefits from template-like structures, including consistent line breaks |
| **Multimodal Input Handling**   | GPT-4o supports images and audio                                                         | LLaMA 3 (future) may add modalities; current LLaMA is text-only            | Mistral is text-only for now                                             |


# Adding Language and translation

{% embed url="<https://youtu.be/cz4RBz3mXrI>" %}

### **Add Speech Recognition and Translation**

This guide explains how to enable speech recognition and translation in your GUI AI-powered AI Agent, using the example of a hypertension health assistant. These features are especially useful for building multilingual bots—like an agriculture assistant for Northern India, where Hindi is widely spoken. With these capabilities, users can send voice notes in their preferred language and receive answers in the same language.

#### **Enabling Speech Recognition**

* In the Capabilities section, enable the **Speech Recognition** feature. This allows users to record voice messages directly into the AI Agent.

<figure><img src="https://2450152260-files.gitbook.io/~/files/v0/b/gitbook-x-prod.appspot.com/o/spaces%2FNWqgWAjD0VVJgjYDpsN5%2Fuploads%2FoCJcYsjj119cqJqkR3Rb%2FScreenshot%202025-05-15%20at%2011.45.51%E2%80%AFAM.png?alt=media&amp;token=eeccfdd5-d32e-41e8-a900-090409e58998" alt=""><figcaption></figcaption></figure>

### Test

Click the microphone/clip icon in the message section, record a question (e.g., “What is your recommendation for drug classes as first-line agents?”), and click on "Send".

<figure><img src="https://2450152260-files.gitbook.io/~/files/v0/b/gitbook-x-prod.appspot.com/o/spaces%2FNWqgWAjD0VVJgjYDpsN5%2Fuploads%2FrJNTT1juB96xCfzOn6IZ%2FScreenshot%202025-05-15%20at%2012.10.15%E2%80%AFPM.png?alt=media&amp;token=171f08a4-87c5-4edd-9fe0-f8479ff80a5a" alt=""><figcaption></figcaption></figure>

* The LLM processes the transcribed text and generates a response, referencing the knowledge base (e.g., the WHO hypertension guidelines).

### Adding T**ranslation**

Many LLMs may not fully understand non-English languages, so translation is essential to any AI Agent pipeline.&#x20;

Steps to follow:&#x20;

* To support other languages (e.g., Hindi), enable the **Translation** feature alongside speech recognition.
  * Select your translation provider (e.g., Google Translate).
  * Set the target translation language (e.g., Hindi).
* Now, when a user submits a voice note in their preferred language, the system will:
  * Transcribe the audio
  * Translate the input to English for the LLM (if needed)
  * Process the question
  * Translate the LLM’s response back into the user’s language (e.g., Hindi)

### **Next Steps**

* In the next guide, you’ll learn how to add **Text-to-Speech**, allowing users to listen to responses in their language instead of reading.


# Setup Text-to-Speech

{% embed url="<https://youtu.be/ikCMtvBEv2o>" %}

### Enable Text-to-Speech

Enable Text to Speech in the "Capabilities" section

<figure><img src="https://2450152260-files.gitbook.io/~/files/v0/b/gitbook-x-prod.appspot.com/o/spaces%2FNWqgWAjD0VVJgjYDpsN5%2Fuploads%2FmHWiqegId8bHev1b4qRM%2FScreenshot%202025-05-15%20at%2012.28.59%E2%80%AFPM.png?alt=media&amp;token=e1b82d1a-bc0a-4a81-b0d4-e017347a572b" alt=""><figcaption></figcaption></figure>

### Test

Follow the steps from the previous section on [Adding Language and Translation](/ai-for-impact/module-6) to send a voice note to the Copilot. Once the Text-to-Speech Capabilities are enabled, you will observe that your text response has a small Audio Player.&#x20;

<figure><img src="https://2450152260-files.gitbook.io/~/files/v0/b/gitbook-x-prod.appspot.com/o/spaces%2FNWqgWAjD0VVJgjYDpsN5%2Fuploads%2FDBzZi62XPNtfHZUpWYHm%2FScreenshot%202025-05-15%20at%2012.30.05%E2%80%AFPM.png?alt=media&amp;token=ecae8d3f-d31c-42cd-bf23-dfca1cd264fb" alt=""><figcaption></figcaption></figure>


# Deploy Your First Web AI Agent

{% embed url="<https://youtu.be/hu8vlNwuOwQ>" %}

**SET UP INTEGRATION CONFIG**

1. Click on the Integrations tab
2. Use the “Gooey.AI” button

<figure><img src="https://docs.gooey.ai/~gitbook/image?url=https%3A%2F%2F662560811-files.gitbook.io%2F%7E%2Ffiles%2Fv0%2Fb%2Fgitbook-x-prod.appspot.com%2Fo%2Fspaces%252F5BFP5RUm6rTLXk8wUSTf%252Fuploads%252FAEcxNGjpgWYqbFxa38He%252F0.png%3Falt%3Dmedia&#x26;width=768&#x26;dpr=4&#x26;quality=100&#x26;sign=59ce00c9&#x26;sv=2" alt=""><figcaption></figcaption></figure>

1. This will open the Web widget configuration page. You can add the following details:
   1. Name of the bot
   2. Description - this will be the introduction of the bot
   3. By line and website link
   4. Conversation Starters - add some introductory questions for the users

<figure><img src="https://docs.gooey.ai/~gitbook/image?url=https%3A%2F%2F662560811-files.gitbook.io%2F%7E%2Ffiles%2Fv0%2Fb%2Fgitbook-x-prod.appspot.com%2Fo%2Fspaces%252F5BFP5RUm6rTLXk8wUSTf%252Fuploads%252FrQO1BSHeS9dFj2I721pH%252F1.png%3Falt%3Dmedia&#x26;width=768&#x26;dpr=4&#x26;quality=100&#x26;sign=14710903&#x26;sv=2" alt=""><figcaption></figcaption></figure>

1. Hit Update
2. Test your bot here:
   1. Click on the “Message the bot” button and test the bot.

**EMBED TO WEBSITE**

<figure><img src="https://docs.gooey.ai/~gitbook/image?url=https%3A%2F%2F662560811-files.gitbook.io%2F%7E%2Ffiles%2Fv0%2Fb%2Fgitbook-x-prod.appspot.com%2Fo%2Fspaces%252F5BFP5RUm6rTLXk8wUSTf%252Fuploads%252FVR3MrH4eKlp4L5FSEZMP%252F2.png%3Falt%3Dmedia&#x26;width=768&#x26;dpr=4&#x26;quality=100&#x26;sign=ef578bc2&#x26;sv=2" alt=""><figcaption></figcaption></figure>

Once you are happy with the performance of the tests, you can Embed the bot in your production website with just two lines of code.


# Your first evals!

### What is a Golden Q\&A?

A Golden Q\&A is a list of common questions and accurate answers, created by experts on your team. These are used to test your AI Agent's performance.&#x20;

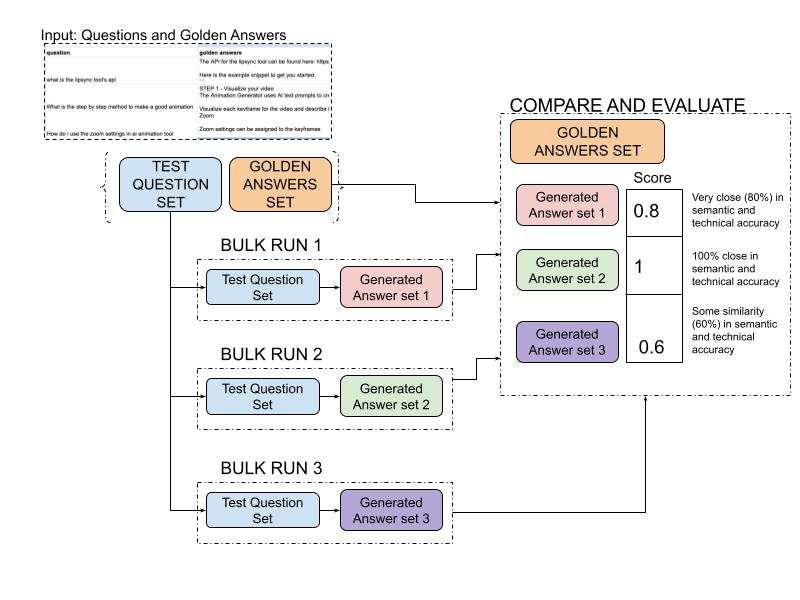
### Bulk Evaluation Process (Overview)

* The Golden Q\&A sheet is used as the test set in the [bulk evaluator](https://gooey.ai/bulk).
* For each question, the AI Agent generates an answer.
* The evaluator compares the AI Agent answer to the expert (golden) answer.
* Scores are based on technical accuracy, citation correctness, and answer quality.

<figure><img src="https://2450152260-files.gitbook.io/~/files/v0/b/gitbook-x-prod.appspot.com/o/spaces%2FNWqgWAjD0VVJgjYDpsN5%2Fuploads%2FnNu3lzK09kIU6i5ag9t9%2Fimage.png?alt=media&amp;token=915b3b03-a449-4eee-b2de-3991ef6c4d91" alt=""><figcaption></figcaption></figure>

<figure><img src="https://2450152260-files.gitbook.io/~/files/v0/b/gitbook-x-prod.appspot.com/o/spaces%2FNWqgWAjD0VVJgjYDpsN5%2Fuploads%2FgylgPi2vgS78n0i36fQ3%2Fimage.png?alt=media&amp;token=24119a3a-388f-4ca0-9e67-58c37e2c320f" alt=""><figcaption></figcaption></figure>

## Why is bulk run and evaluation important?

Bulk runs and evaluations help you with:

* Choosing the right&#x20;
  * LLM
  * TTS
  * STT
  * Translations
* Improving your overall AI Agent's responses
* Assess time vs cost for the choice of the pipeline
* <mark style="background-color:green;">Check regressions regularly</mark>

### Why do you need a bulk runner and evaluations? <a href="#id-4zynvpxsa8kj" id="id-4zynvpxsa8kj"></a>

When building your Gooey.AI workflows, you will have to tweak the settings often to ensure the responses show parity and are grounded and verifiable.

**There are several components to test:**

* testing prompts
* ensuring the synthetic data retrieval works
* checking the suitability of the language model and its advanced settings
* Latency of generated answers
* evaluation of the final AI Agent to produce the Golden Answers
* evaluation of the price per run
* regression tests

How can you do this at scale?

**This is where Gooey.AI’s Bulk and Evaluation features shine!**

### Features of Bulk Runner and Evaluation <a href="#eheq9i411cm3" id="eheq9i411cm3"></a>

* Run several models in one click
* Run several iterations of your workflows at scale
* Choose any of the API Response Outputs to populate your test
* Get output in CSV for further data analysis
* Built-in evaluation tool for quick analysis
* Use CSV or Google Sheets as input

<table data-view="cards"><thead><tr><th></th><th data-hidden data-card-target data-type="content-ref"></th></tr></thead><tbody><tr><td><strong>Common terms in bulk and evaluation</strong></td><td><a href="https://docs.gooey.ai/guides/understanding-bulk-runner-and-evaluation#id-3yvzoyislzdo">https://docs.gooey.ai/guides/understanding-bulk-runner-and-evaluation#id-3yvzoyislzdo</a></td></tr></tbody></table>


# How to prepare your Golden Q\&A

### Checklist Before the Session

* [x] Prepare 10–20 typical user questions
* [x] Write expert answers for each
* [x] Add citation links or references for every answer
* [x] Organize everything in a Google Sheet/CSV (add Audio column if needed)

{% embed url="<https://www.youtube.com/watch?v=qGfhSDoX034>" %}

## How to Prepare Your Golden Q\&A for Evaluating Your AI Agent

This document explains how to prepare your Golden Q\&A for use with Gooey.AI’s bulk evaluator. Follow each step to ensure your AI Agent can be tested and improved effectively.

### 1. Gather Typical User Questions

* Identify 10 to 20 common questions users might ask your AI Agent.
* These should cover important topics and key use cases.

### 2. Write Expert Answers

* Write the most accurate answer for each question you would want your AI Agent to give.
* Subject matter experts or your product team should write answers.

### 3. Add Citations

* For every answer, include a citation.
* The citation is a link or reference to the source material (webpage, PDF, document, knowledge base).
* If citing a PDF or document, include the page number or section.

### 4. Use Google Sheets for Organization

* Create a Google Sheet with the following columns:
  * Question
  * Answer
  * Citation (URL, document link, or specific page/section)
* If you are evaluating audio (user voice notes), add an “Audio” column. Place the Google Drive link to the audio recording for that question.

### 5. Example Google Sheet Format

| Audio (if needed)          | Question                        | Golden Answer                | Citation            |
| -------------------------- | ------------------------------- | ---------------------------- | ------------------- |
| \[Google Drive audio link] | What is the lip sync tools API? | The lip sync tools API is... | \[Link to API docs] |
| \[Google Drive audio link] | How do I animate a character?   | To animate a character...    | \[Link to tutorial] |

**You can duplicate this** [**Google Sheet**](https://docs.google.com/spreadsheets/d/1yw5VFASGUehz0vdhHIVvPgTh3xRXuubfqaDWAkG0ZAM/edit?usp=sharing)

### **Learn more about Speech Recognition Evals here:**

{% embed url="<https://docs.gooey.ai/guides/how-to-use-asr/how-to-create-language-evaluation-for-asr>" %}


# How to use bulk runner?

{% embed url="<https://youtu.be/2_k3Zg4Z1Rg>" %}

**1. Prepare Your Test Questions and Golden Answers**

* Create a spreadsheet with your test questions and golden answers.
* Your sheet should have columns for:&#x20;
  * question
  * golden answer
  * citation (if needed)
  * audio file as a Google Drive link if needed

<figure><img src="https://2450152260-files.gitbook.io/~/files/v0/b/gitbook-x-prod.appspot.com/o/spaces%2FNWqgWAjD0VVJgjYDpsN5%2Fuploads%2FNkccGEpwsc4L9SBPBIfX%2FScreenshot%202025-05-21%20at%205.25.20%E2%80%AFPM.png?alt=media&amp;token=40f00810-ab77-44e5-9528-431afba6ac18" alt=""><figcaption></figcaption></figure>

**2. Create or Duplicate Your AI Agent**

* You need a AI Agent for each model or prompt you want to test.
* To create a new AI Agent for a different model (for example, to test Gemini 2.5 Pro vs. GPT 4.1):
  * Go to your existing AI Agent, click "Update," then "Save as new" to duplicate it.
  * Choose the new model (such as Gemini 2.5).
  * Update the name (for example, "Gemini 2.5").
  * Click "Save".

**3. Set Up the Bulk Run**

* Go to [gooey.ai/bulk](https://gooey.ai/bulk).
* Link your spreadsheet containing the test questions and golden answers:
  * In the "Input data spreadsheet" section, click "Link" and paste your spreadsheet URL.
  * Click "Import."
* Once imported, check that your questions and golden answers have loaded correctly.

<figure><img src="https://2450152260-files.gitbook.io/~/files/v0/b/gitbook-x-prod.appspot.com/o/spaces%2FNWqgWAjD0VVJgjYDpsN5%2Fuploads%2FqyHBDtzm1AEM55FLoNdw%2FScreenshot%202025-05-21%20at%205.19.38%E2%80%AFPM.png?alt=media&amp;token=3d912c25-1838-45d5-a6d7-8ec669a53a47" alt=""><figcaption></figcaption></figure>

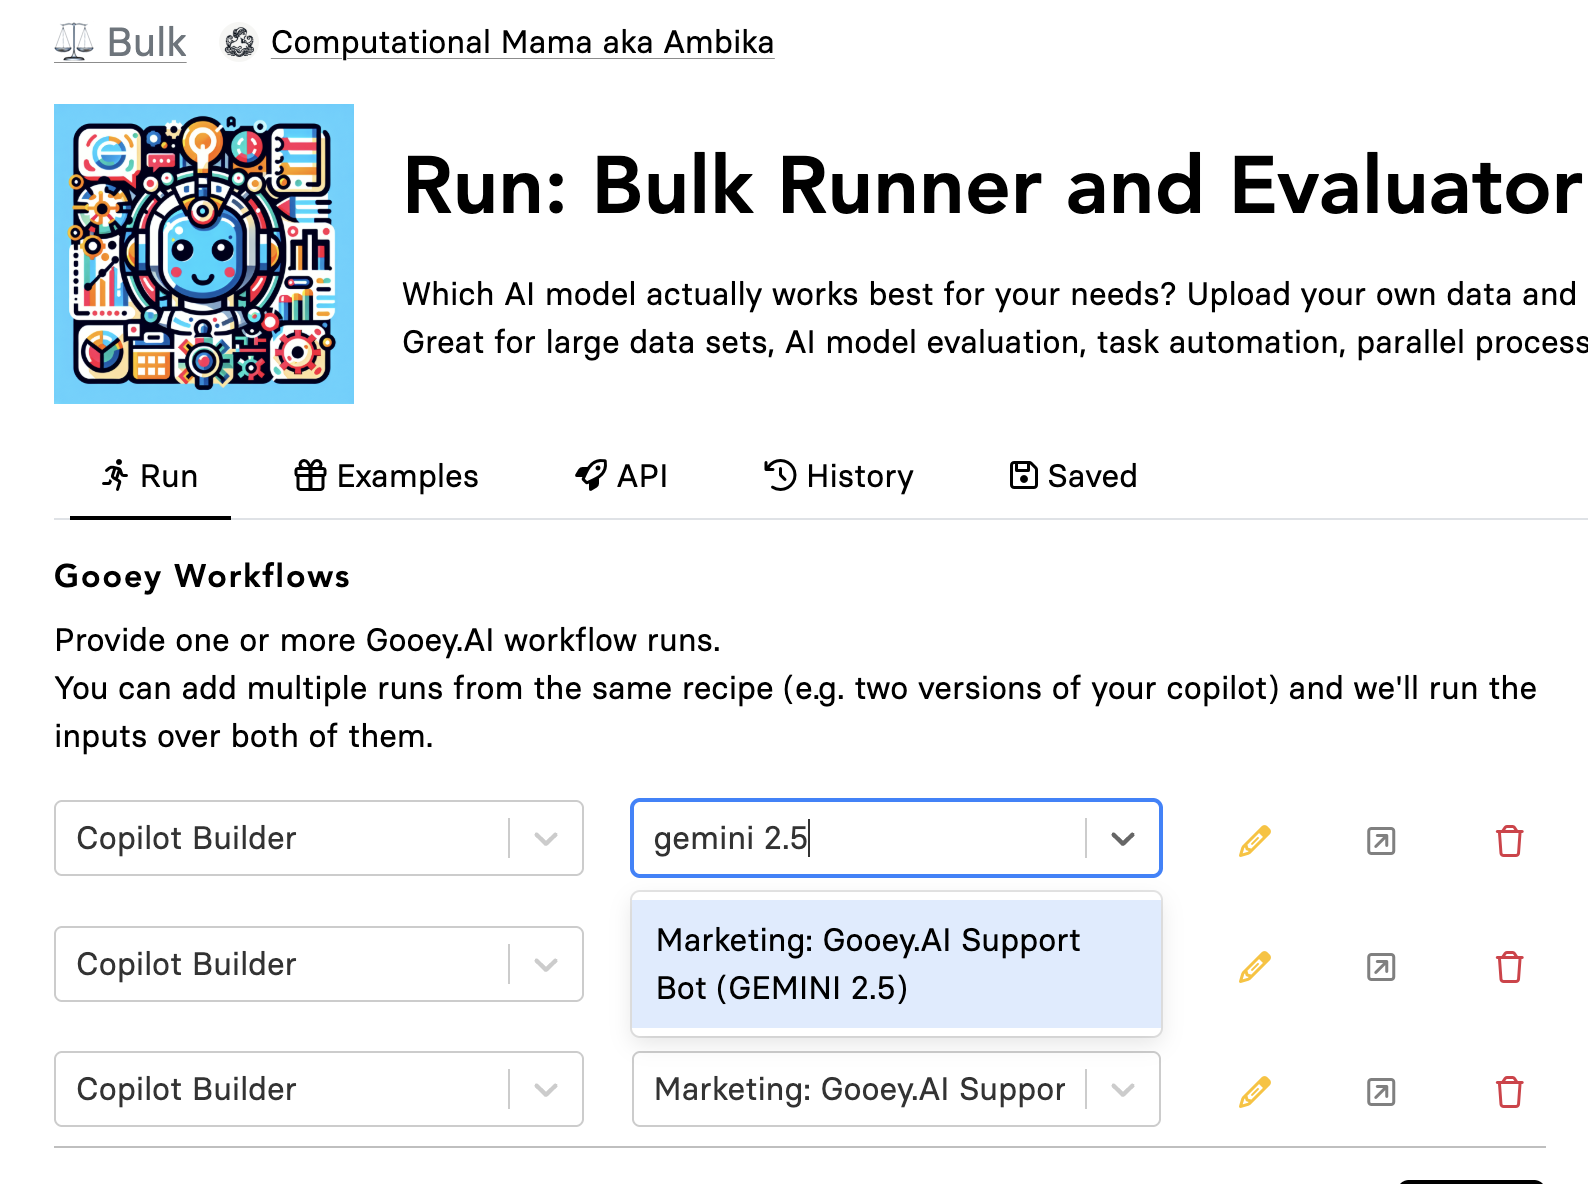
**4. Add Your AI Agents as Workflows**

* In the bulk runner, click "Add workflow."
* Start typing the name of your AI Agent (for example, "marketing\_gooey\_support\_bot") and select it.
* Add each AI Agent you want to compare (for example, one for GPT 4.0, one for Gemini 2.5 Pro).

<figure><img src="https://2450152260-files.gitbook.io/~/files/v0/b/gitbook-x-prod.appspot.com/o/spaces%2FNWqgWAjD0VVJgjYDpsN5%2Fuploads%2FZYhOHiaIHbOfwarQfDgj%2FScreenshot%202025-05-21%20at%205.19.00%E2%80%AFPM.png?alt=media&amp;token=5ead66f6-a5eb-4537-97f8-da624220a857" alt=""><figcaption></figcaption></figure>

**5. Configure the Input and Output Columns**

* Go to "Show all columns."
* Set "Input prompt" to your question column (e.g., "question").
* Make sure "Output text," "Run URL," and "Runtime" are checked. They help you with results and debugging.

<figure><img src="https://2450152260-files.gitbook.io/~/files/v0/b/gitbook-x-prod.appspot.com/o/spaces%2FNWqgWAjD0VVJgjYDpsN5%2Fuploads%2F9GoyaLs1EfNIpnvXVwel%2FScreenshot%202025-05-21%20at%205.20.05%E2%80%AFPM.png?alt=media&amp;token=45a886d0-13bc-43ae-ba32-48f3adc83945" alt=""><figcaption></figcaption></figure>

**6. Enable Evaluation Workflow**

* In the "Evaluation workflows" section, enable "Copilot evaluator."
* This will compare each model's output to your golden answer and score them.

<figure><img src="https://2450152260-files.gitbook.io/~/files/v0/b/gitbook-x-prod.appspot.com/o/spaces%2FNWqgWAjD0VVJgjYDpsN5%2Fuploads%2FGRqXNbdFsbyRpyERPErY%2FScreenshot%202025-05-21%20at%205.30.31%E2%80%AFPM.png?alt=media&amp;token=5826ec88-4a1f-4434-aaef-b677d196ef21" alt=""><figcaption></figcaption></figure>

{% hint style="info" %}
If you only want to run the bulk runner without evaluation, you can delete the evaluator.
{% endhint %}

**7. Start the Bulk Run**

* Click "Run."
* Gooey.AI will process each question through every selected Copilot/model.
* For each question and Copilot, you get the generated answer, run URL, runtime, and more.

**8. Review and Compare Results**

* In the results sheet:
  * Each row shows the question, the answer from each Copilot, the runtime, and the run URL.
  * At the end, you will see the evaluation scores for each model.
  * The system identifies which model performed the best for each question and overall.

**9. Analyze Performance**

* Look at the evaluation scores (for example, 80%, 100%, 60%).
* Higher scores mean answers closer to the expert-provided golden answer.
* If a new model scores lower, review the answers and ratings to find areas for improvement.

**10. Repeat or Refine**

* You can rerun the evaluation after adjusting prompts, models, or questions.
* Use the results to decide which model or prompt is best for your use case.

### How to add Audio Input in Bulk Evaluations?

{% embed url="<https://youtu.be/w1mKxxIWrRc>" %}


# How to use evaluation?

{% embed url="<https://youtu.be/I7rN2pI7uBw>" %}


# Iterate!

{% embed url="<https://youtu.be/biYtqCqF79I>" %}


# Agentic LLMs, Functions and Developer Tools

Functions allow you to run sandboxed Javascript functions & API calls inside your Gooey.AI workflows.

{% @mermaid/diagram content="---
title: POSSIBILITIES FOR FUNCTIONS
----------------------------------

graph TD

```
subgraph AI Agent
A[User asks a Query] ==> B(AI Agent's RESPONDS)
B ==> C[Response sent to User]
end
D(BEFORE Request to Gooey Workflow)-..->B 
G[(Database)] <--> D
B -..->E(AFTER Request to Gooey Workflow)
E <-->H[(Database)]
```

style A fill:#f9f
style C fill:#f9f
style G fill:#39f
style H fill:#39f" %}

### Example of AFTER Function:&#x20;

{% @mermaid/diagram content="---
title: AFTER FUNCTION FOR ANALYSIS SCRIPT
-----------------------------------------

flowchart TD
A\[User asks a Query] --> B\[AI Agent RESPONDS]
B --> D\[Response sent to User]
D --> |response collected|E{Analysis Script}
A --> |query collected|E
E --> |user needs human handoff|F(AFTER FUNCTION ACTIVATED)
E --> |user was satifised with answer|G\[CHAT LOOP CLOSED]
F --> |user query and contact pushed to CRM|H\[CRM]

" %}

## How do LLM-enabled Functions work?

When the user sends a query in Natural Language, the LLM determines the following:&#x20;

1. does the query require a function?
2. which part of the text should be passed as an argument in the function?

{% @mermaid/diagram content="graph TD
A\[User asks a query] --> B{LLM assess if functions are needed}
C\[LLM responds with function arguments] -->D\[Function is called with arguments]
B --> |Functions needed|C
B --> |Functions not needed|J\[LLM Responds with answer]
D --> E\[Function executes]
E --> F\[Function returns result]
F --> G\[LLM processes function result]
G --> H\[LLM formulates final response]
G --> B
H --> I\[Response sent to user]
J --> I

" %}


# How to use Functions?

### **Step 1** <a href="#step-1" id="step-1"></a>

Head over to the [Functions workflow](https://gooey.ai/functions/)

### **Step 2** <a href="#step-2" id="step-2"></a>

Create your PROMPT Function:

* create a basic fetch call for the weather of any location
* create a serper&#x20;

**You can find more** [**examples here**](https://gooey.ai/functions/examples)

#### A basic Weather API call ([link here](https://gooey.ai/functions/current-weather-rxmquy60p1vq/))

```javascript
async ({ lat, long }) => {
  // Use Open-Meteo's public API for fetching weather data
  let url = `https://api.open-meteo.com/v1/forecast?latitude=${lat}&longitude=${long}&current_weather=true`;
  let response = await fetch(url);
  let data = await response.json();
  return { weather: data.current_weather };
};
```

#### An API call for Serper  - a service for google search ([link here](https://gooey.ai/functions/google-search-without-api-key-tey6zrx2vzvm/))

```javascript
async ({ query }) => {
  var myHeaders = new Headers();
  myHeaders.append("X-API-KEY", "your API key");
  myHeaders.append("Content-Type", "application/json");
  
  var raw = JSON.stringify({
    "q": query
  });
  
  var requestOptions = {
    method: 'POST',
    headers: myHeaders,
    body: raw,
    redirect: 'follow'
  };
  
  let ret = await fetch("https://google.serper.dev/search", requestOptions);

  return { search_results: await ret.json() };
};

```

### **Step 3** <a href="#step-3" id="step-3"></a>

Hit Submit, if your code is working fine you will get your outputs on the right side. Use the “Save as New” button and update the run name.

### **Step 4** <a href="#step-5" id="step-5"></a>

Now head over to the Gooey workflow where you want to add the saved functions.

Head over to the example below:

{% embed url="<https://gooey.ai/copilot/farmerchat-with-current-weather-data-qfzn662xf06v/>" %}

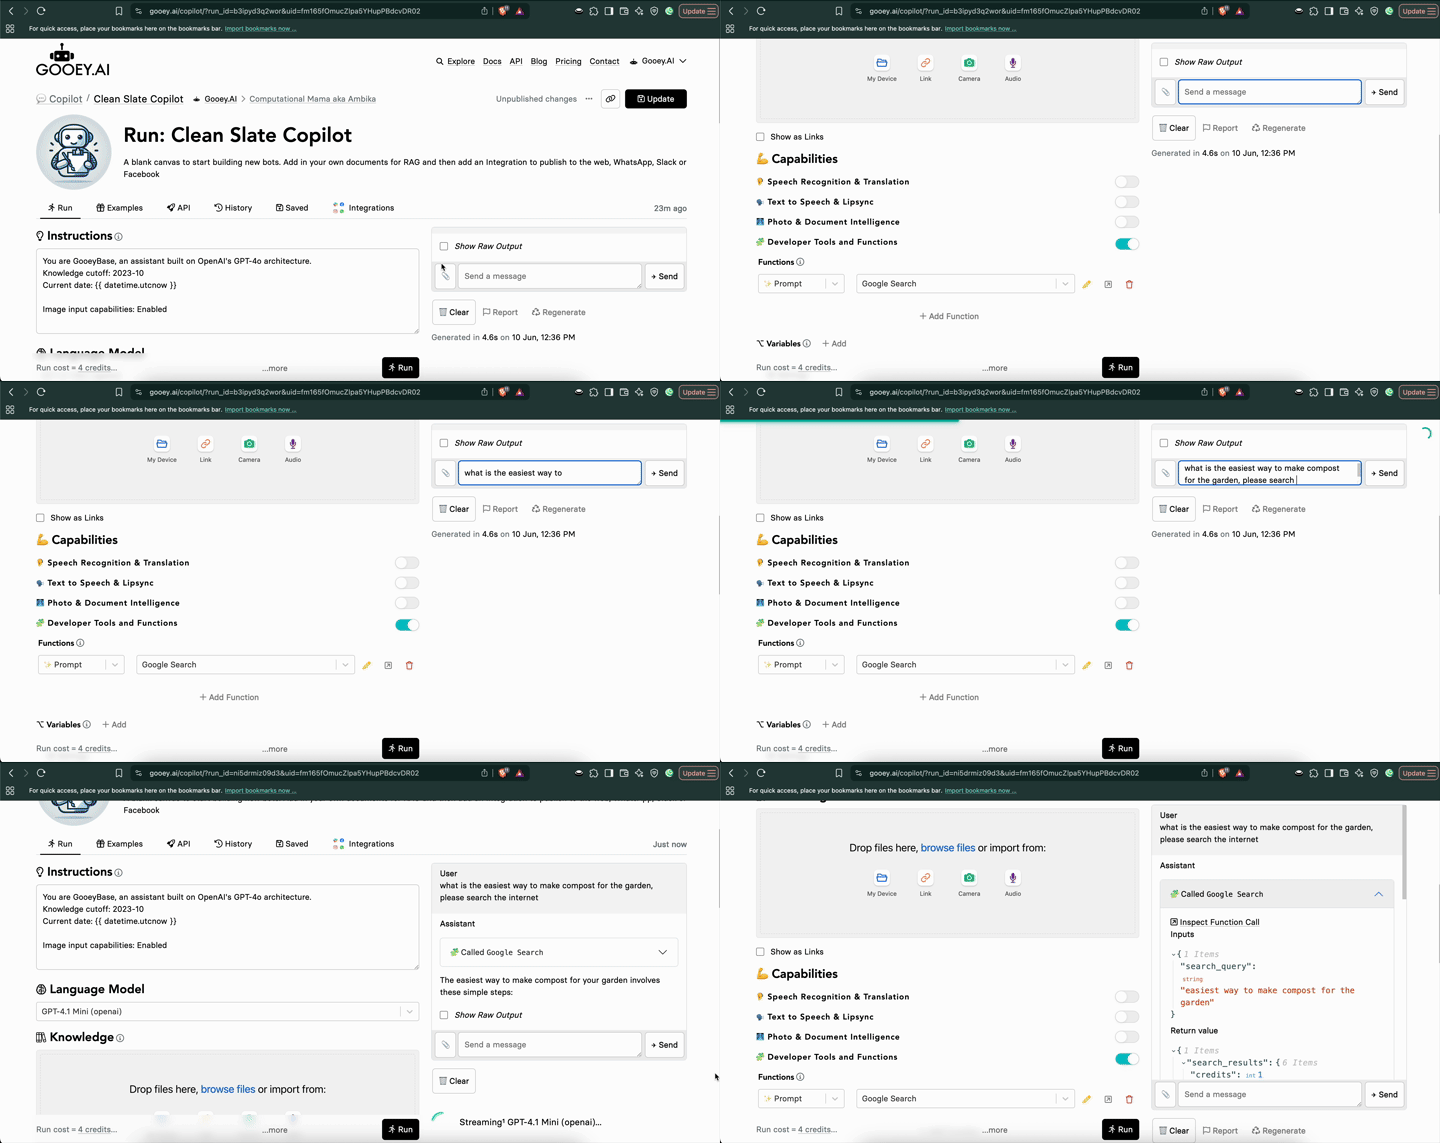
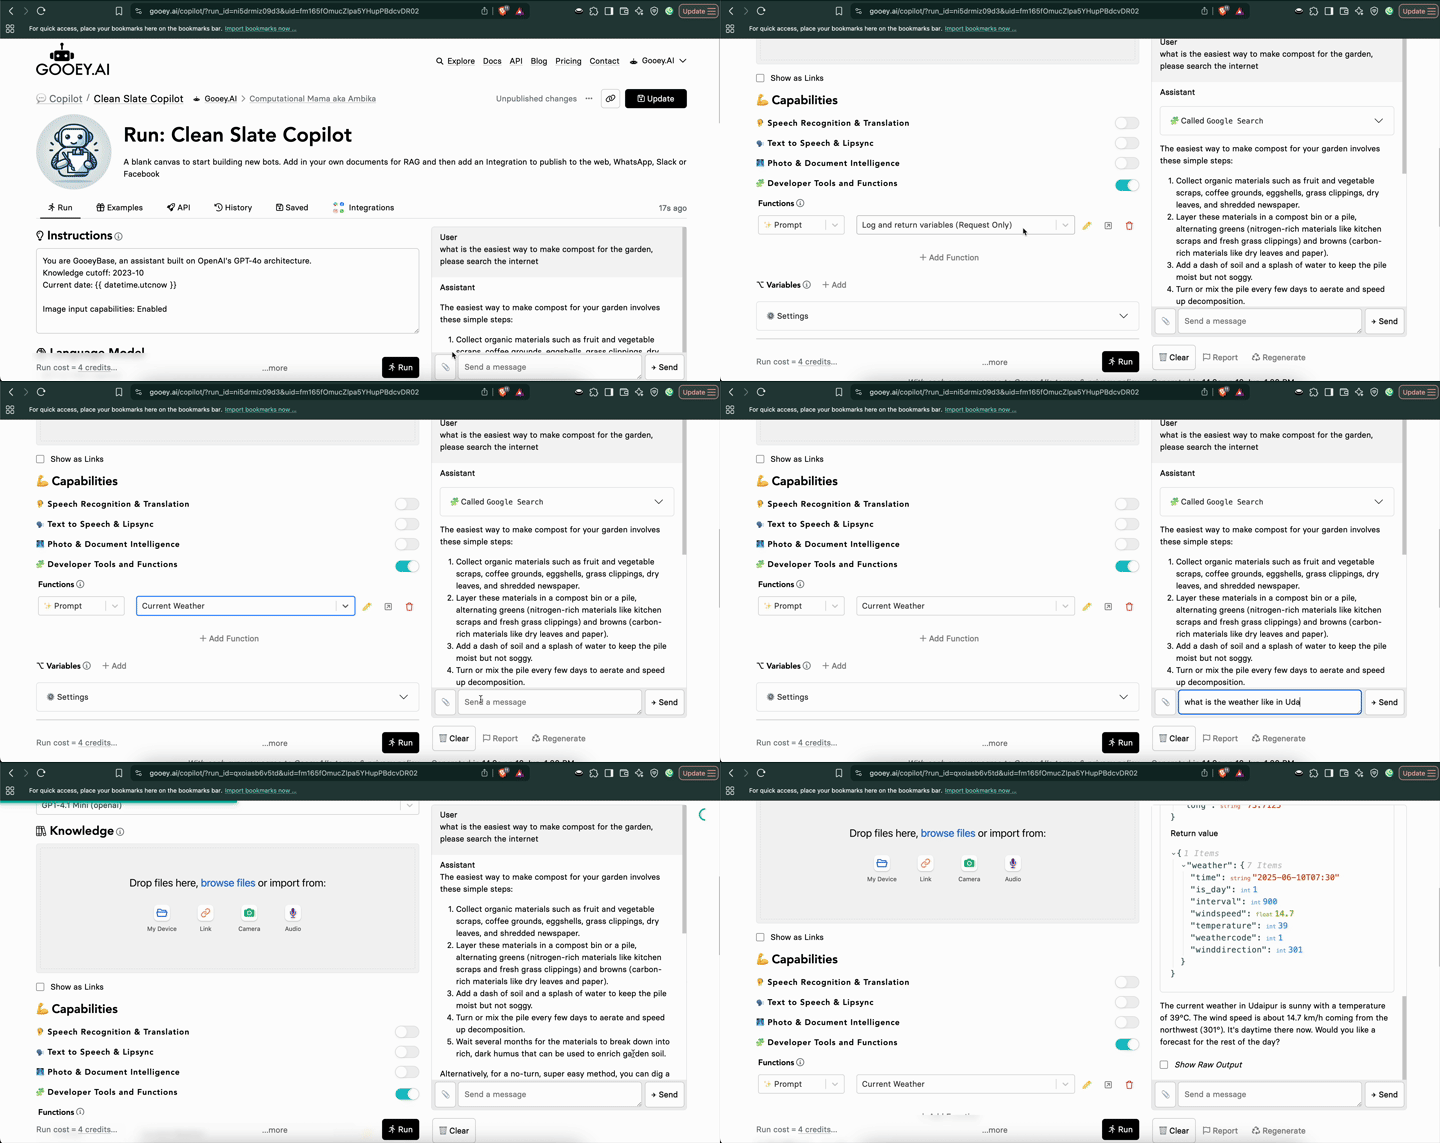
Check the Functions option, and choose “PROMPT” from the dropdown and add your Saved example. And then hit "SUBMIT!

<figure><img src="https://2450152260-files.gitbook.io/~/files/v0/b/gitbook-x-prod.appspot.com/o/spaces%2FNWqgWAjD0VVJgjYDpsN5%2Fuploads%2Fij49AYcg2DKXL6tj0RhZ%2Fimage.png?alt=media&amp;token=769204ef-ecae-4d79-8ef8-7b5cb85c9fb6" alt=""><figcaption></figcaption></figure>

*You can check your Functions output in the Workflow at the end of the page in "Details" section.*

<figure><img src="https://docs.gooey.ai/~gitbook/image?url=https%3A%2F%2F662560811-files.gitbook.io%2F%7E%2Ffiles%2Fv0%2Fb%2Fgitbook-x-prod.appspot.com%2Fo%2Fspaces%252F5BFP5RUm6rTLXk8wUSTf%252Fuploads%252FenY8Js0Pe22WJWCN5Ook%252FScreenshot%25202024-08-09%2520at%25202.02.41%25E2%2580%25AFPM.png%3Falt%3Dmedia%26token%3D7386368f-50b3-4def-b495-977fcb610b40&#x26;width=768&#x26;dpr=4&#x26;quality=100&#x26;sign=c63c07c8&#x26;sv=1" alt=""><figcaption></figcaption></figure>

<figure><img src="https://2450152260-files.gitbook.io/~/files/v0/b/gitbook-x-prod.appspot.com/o/spaces%2FNWqgWAjD0VVJgjYDpsN5%2Fuploads%2F2TQxiDyHeMPT2HwFEV3C%2FScreenshot%202024-10-19%20at%201.15.29%E2%80%AFAM.png?alt=media&amp;token=ad9cefcb-08c9-4ffc-a9b3-634ef22c2567" alt=""><figcaption></figcaption></figure>


# Adding Functions for Value-Adds

### Google Search

<figure><img src="https://2450152260-files.gitbook.io/~/files/v0/b/gitbook-x-prod.appspot.com/o/spaces%2FNWqgWAjD0VVJgjYDpsN5%2Fuploads%2FlQvOVz56th3JVDcglry5%2Fgoogle%20processed.gif?alt=media&amp;token=63ae5795-5000-47c3-a8c4-5074b93e0ef7" alt=""><figcaption></figcaption></figure>

### Weather

<figure><img src="https://2450152260-files.gitbook.io/~/files/v0/b/gitbook-x-prod.appspot.com/o/spaces%2FNWqgWAjD0VVJgjYDpsN5%2Fuploads%2FqUmcwJfBIgiu6St9z2UF%2Fweather%20processed.gif?alt=media&amp;token=a0d5c68f-5eaa-4ce2-9504-be92ac7ca14d" alt=""><figcaption></figcaption></figure>


# Adding Functions for Data

You can use custom REST APIs and JS Functions through the Functions sandbox.&#x20;

<table data-view="cards"><thead><tr><th></th><th data-hidden data-card-target data-type="content-ref"></th><th data-hidden data-card-cover data-type="files"></th></tr></thead><tbody><tr><td>How to Connect FirebaseDB to AI Agent</td><td><a href="https://docs.gooey.ai/tools/how-to-use-gooey-functions/how-to-connect-firebasedb-to-copilot">How to connect FirebaseDB to Copilot</a></td><td><a href="https://2450152260-files.gitbook.io/~/files/v0/b/gitbook-x-prod.appspot.com/o/spaces%2FNWqgWAjD0VVJgjYDpsN5%2Fuploads%2FVryDhxdQjdsnxFatcGqc%2FAccelerator%20videos%20thumbnails.png?alt=media&amp;token=47d74298-60dd-4493-b992-8e3c7e08fa5f">Accelerator videos thumbnails.png</a></td></tr><tr><td>EXAMPLE: FirebaseDB (POST) </td><td><a href="https://gooey.ai/functions/firebase-rtdb-post-with-cryptohash-8vs0hcmv8fuz/">https://gooey.ai/functions/firebase-rtdb-post-with-cryptohash-8vs0hcmv8fuz/</a></td><td><a href="https://2450152260-files.gitbook.io/~/files/v0/b/gitbook-x-prod.appspot.com/o/spaces%2FNWqgWAjD0VVJgjYDpsN5%2Fuploads%2FyWiwiRurSqvgBEcK60lb%2Fexamplefirebase.png?alt=media&amp;token=1e949139-58eb-4a2b-91cc-6878b80eb9e3">examplefirebase.png</a></td></tr><tr><td>EXAMPLE: FirebaseDB (GET) </td><td><a href="https://gooey.ai/functions/firebase-rtdb-get-nurse-julie-with-cryptohash-xfjguuiesy28/">https://gooey.ai/functions/firebase-rtdb-get-nurse-julie-with-cryptohash-xfjguuiesy28/</a></td><td><a href="https://2450152260-files.gitbook.io/~/files/v0/b/gitbook-x-prod.appspot.com/o/spaces%2FNWqgWAjD0VVJgjYDpsN5%2Fuploads%2FNBFeSPMk13AdW7y1Oib7%2FAccelerator%20videos%20thumbnails%20(2).png?alt=media&amp;token=f441a3b7-36e4-48bc-871d-aa466e31319c">Accelerator videos thumbnails (2).png</a></td></tr><tr><td>EXAMPLE: Using ISDA Soil API</td><td><a href="https://gooey.ai/functions/isda-soil-api-s1zad30sloo4/">https://gooey.ai/functions/isda-soil-api-s1zad30sloo4/</a></td><td><a href="https://2450152260-files.gitbook.io/~/files/v0/b/gitbook-x-prod.appspot.com/o/spaces%2FNWqgWAjD0VVJgjYDpsN5%2Fuploads%2FbhSDGn6U4yvYmPBEKR9p%2FAccelerator%20videos%20thumbnails%20(1).png?alt=media&amp;token=e4b9271b-5695-4e24-8f0d-50a6cc01ab47">Accelerator videos thumbnails (1).png</a></td></tr></tbody></table>


# Deploy on WhatsApp

**Prerequisites**

* Verified Facebook business account
* A new or spare phone number for the WhatsApp bot

**Integration**

Click on the [Deploy tab](< https://gooey.ai/copilot/integrations/>) in the AI Agent workflow

![](https://2450152260-files.gitbook.io/~/files/v0/b/gitbook-x-prod.appspot.com/o/spaces%2FNWqgWAjD0VVJgjYDpsN5%2Fuploads%2FMdiwuySBJ7U9NNjNvtis%2FScreenshot%202025-11-07%20at%206.08.10%E2%80%AFPM.png?alt=media\&token=704b6107-a02b-4f35-bfac-a481b94a65da)

* Use the “WhatsApp” button
* You’ll be redirected to the Facebook Login Page&#x20;

> NOTE: Gooey connects to a Facebook profile, it will not connect to a Facebook Page. If you don't have access to the Facebook profile/account of your organization, we suggest making a special Facebook profile for this.

* Follow the instructions on the Facebook page

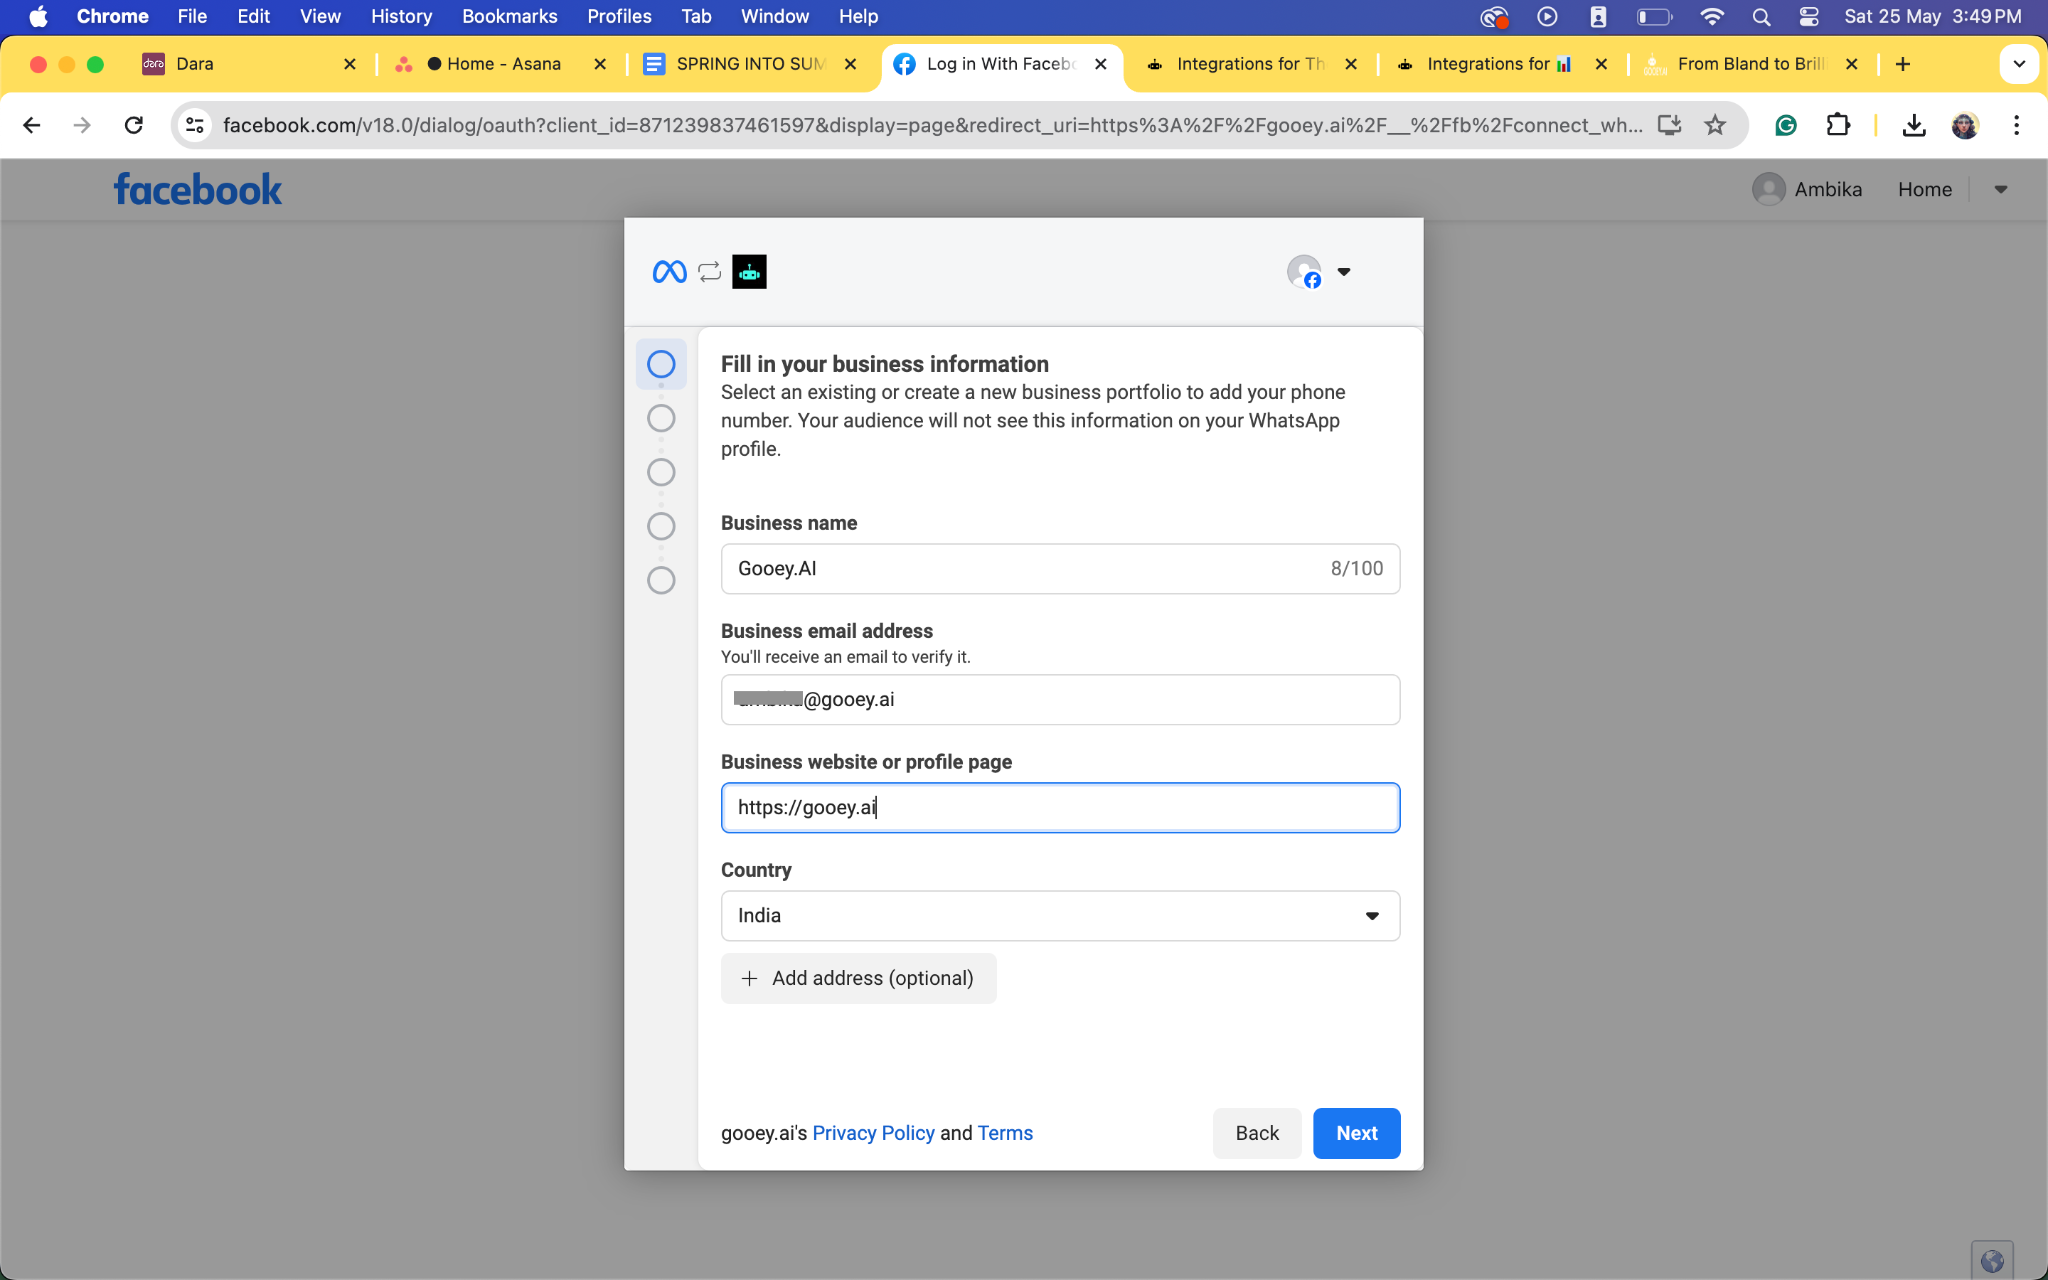
### Step 1 - Fill in Business Information

<figure><img src="https://2450152260-files.gitbook.io/~/files/v0/b/gitbook-x-prod.appspot.com/o/spaces%2FNWqgWAjD0VVJgjYDpsN5%2Fuploads%2FOI1fR6i447RxncqBIbPC%2F1.png?alt=media&amp;token=6c430f01-3dfa-417e-85ca-9cac793c77b8" alt=""><figcaption></figcaption></figure>

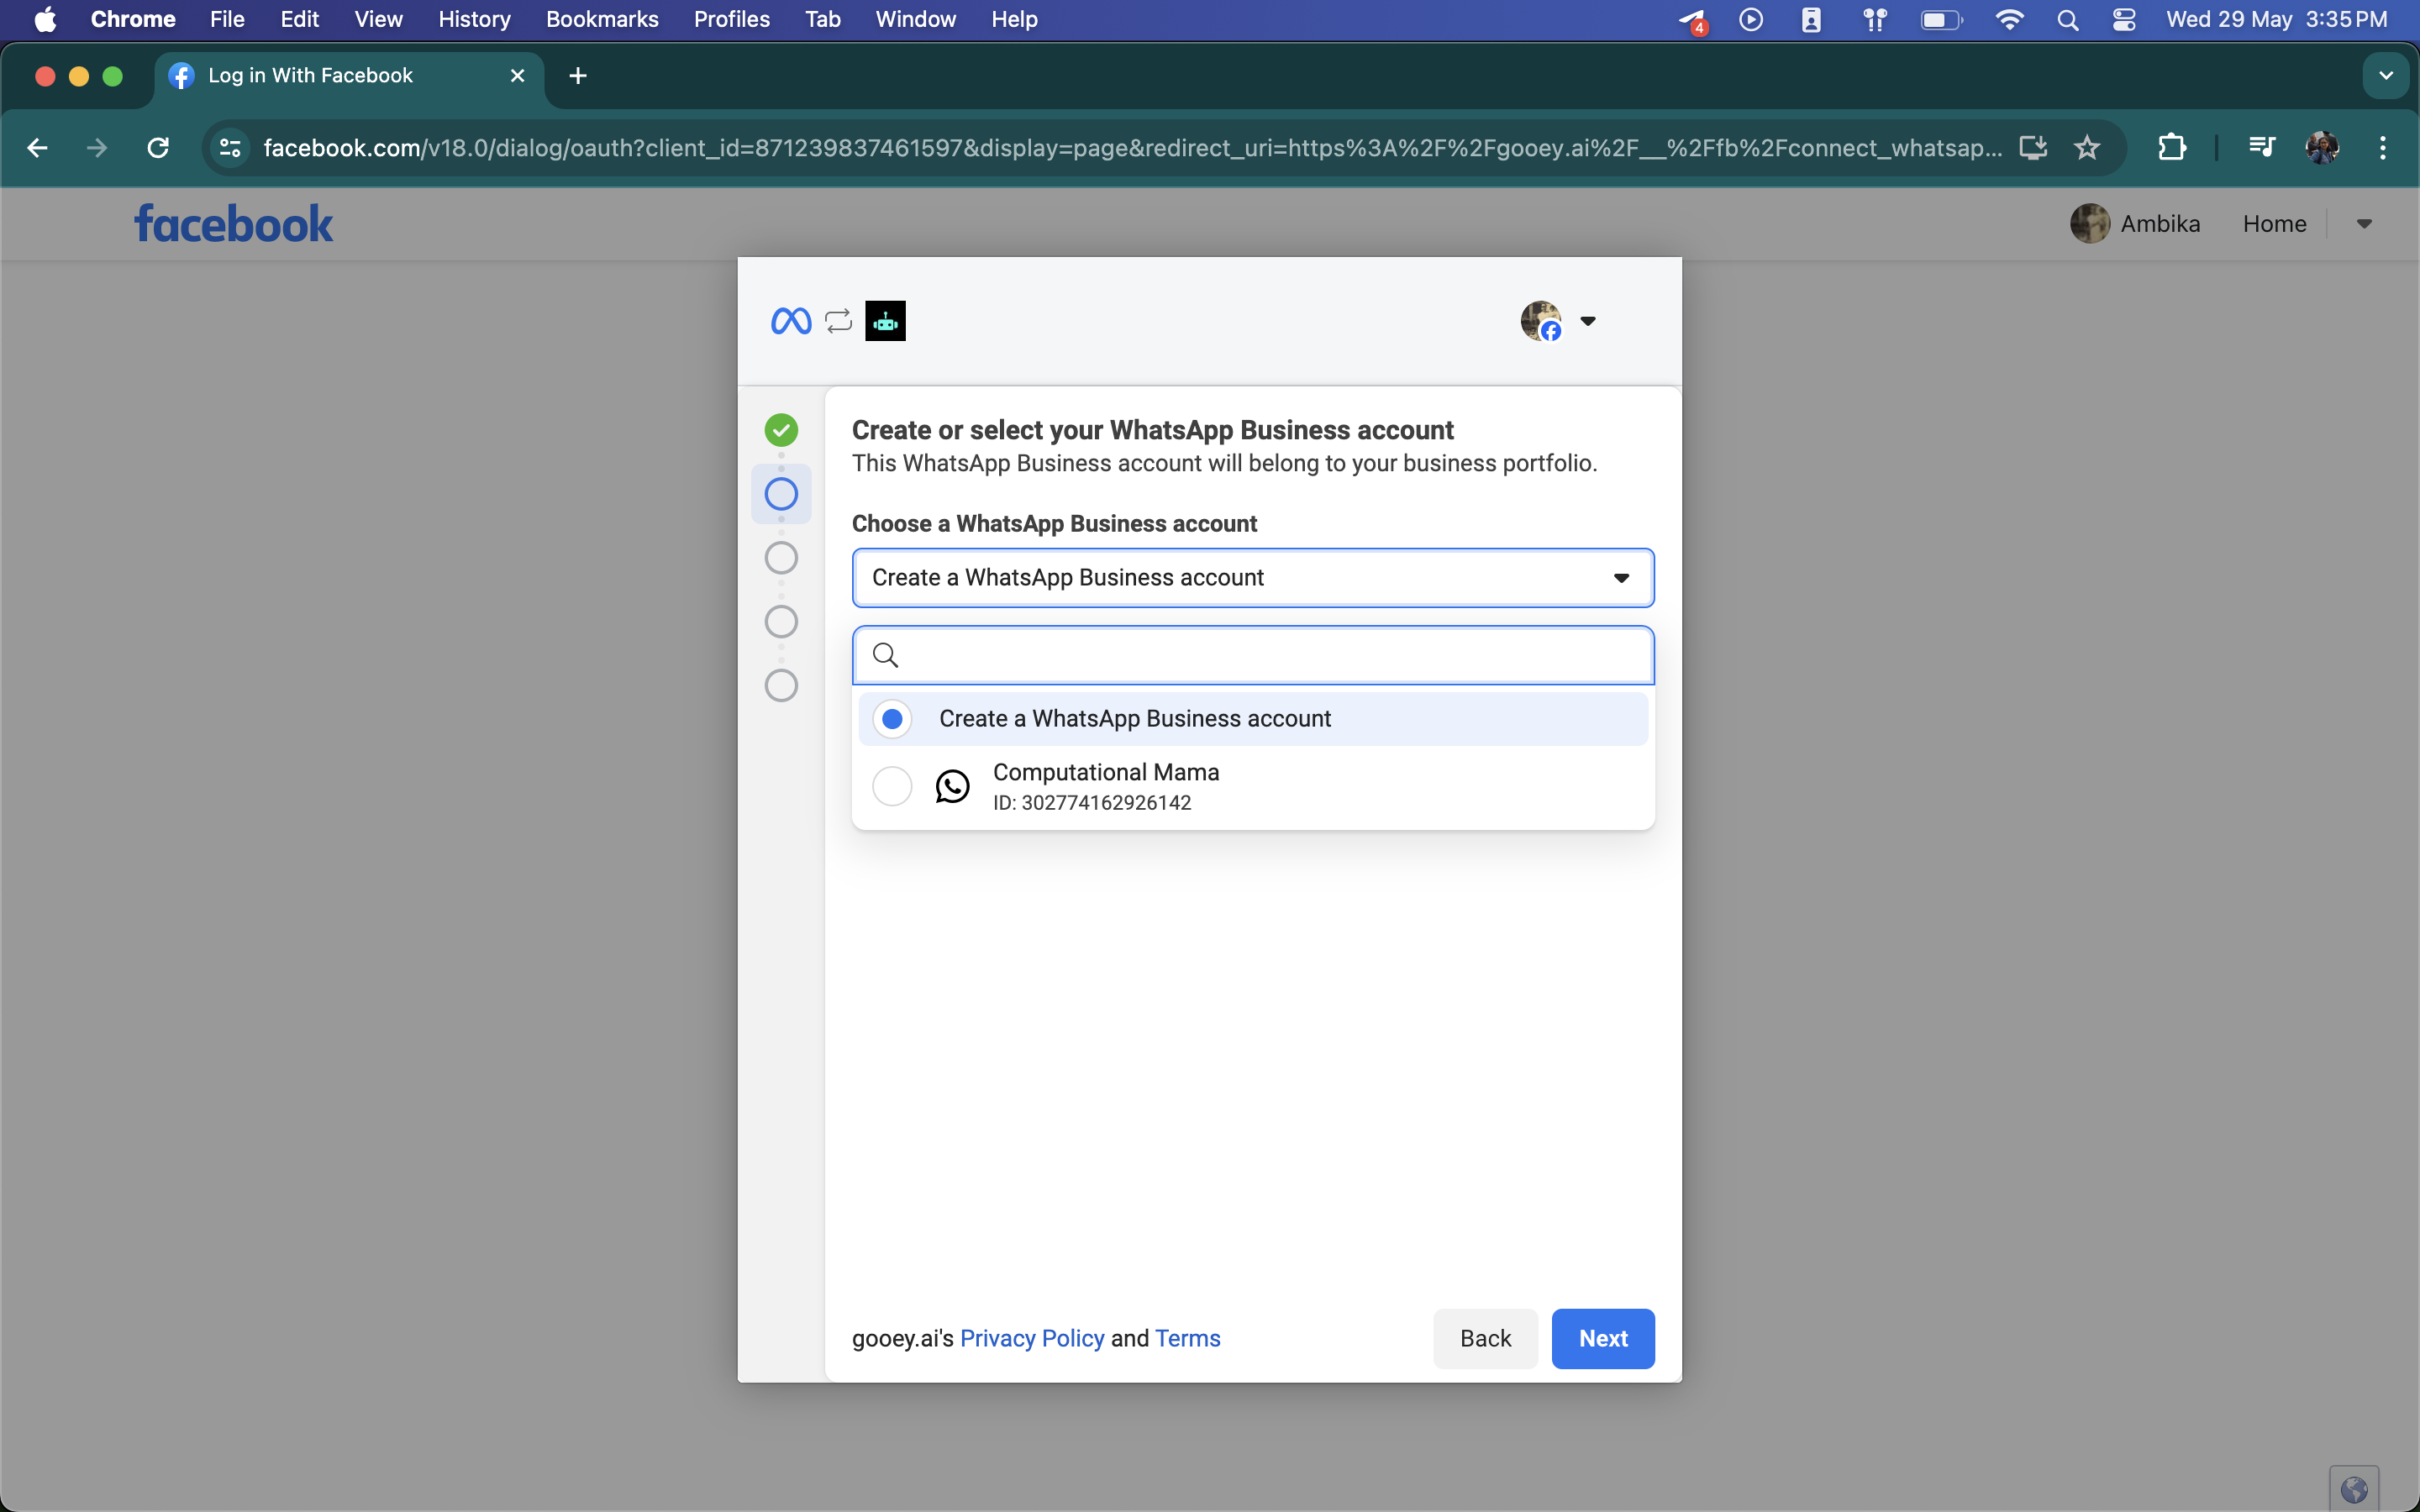
### Step 2 - Choose your business account (or create a new one)

<figure><img src="https://2450152260-files.gitbook.io/~/files/v0/b/gitbook-x-prod.appspot.com/o/spaces%2FNWqgWAjD0VVJgjYDpsN5%2Fuploads%2F5OJDOrpo2N568ZXY0kOe%2FScreenshot%202024-05-29%20at%203.35.21%E2%80%AFPM.png?alt=media&amp;token=dc4655fc-9c72-4b57-9549-846e0c59e512" alt=""><figcaption></figcaption></figure>

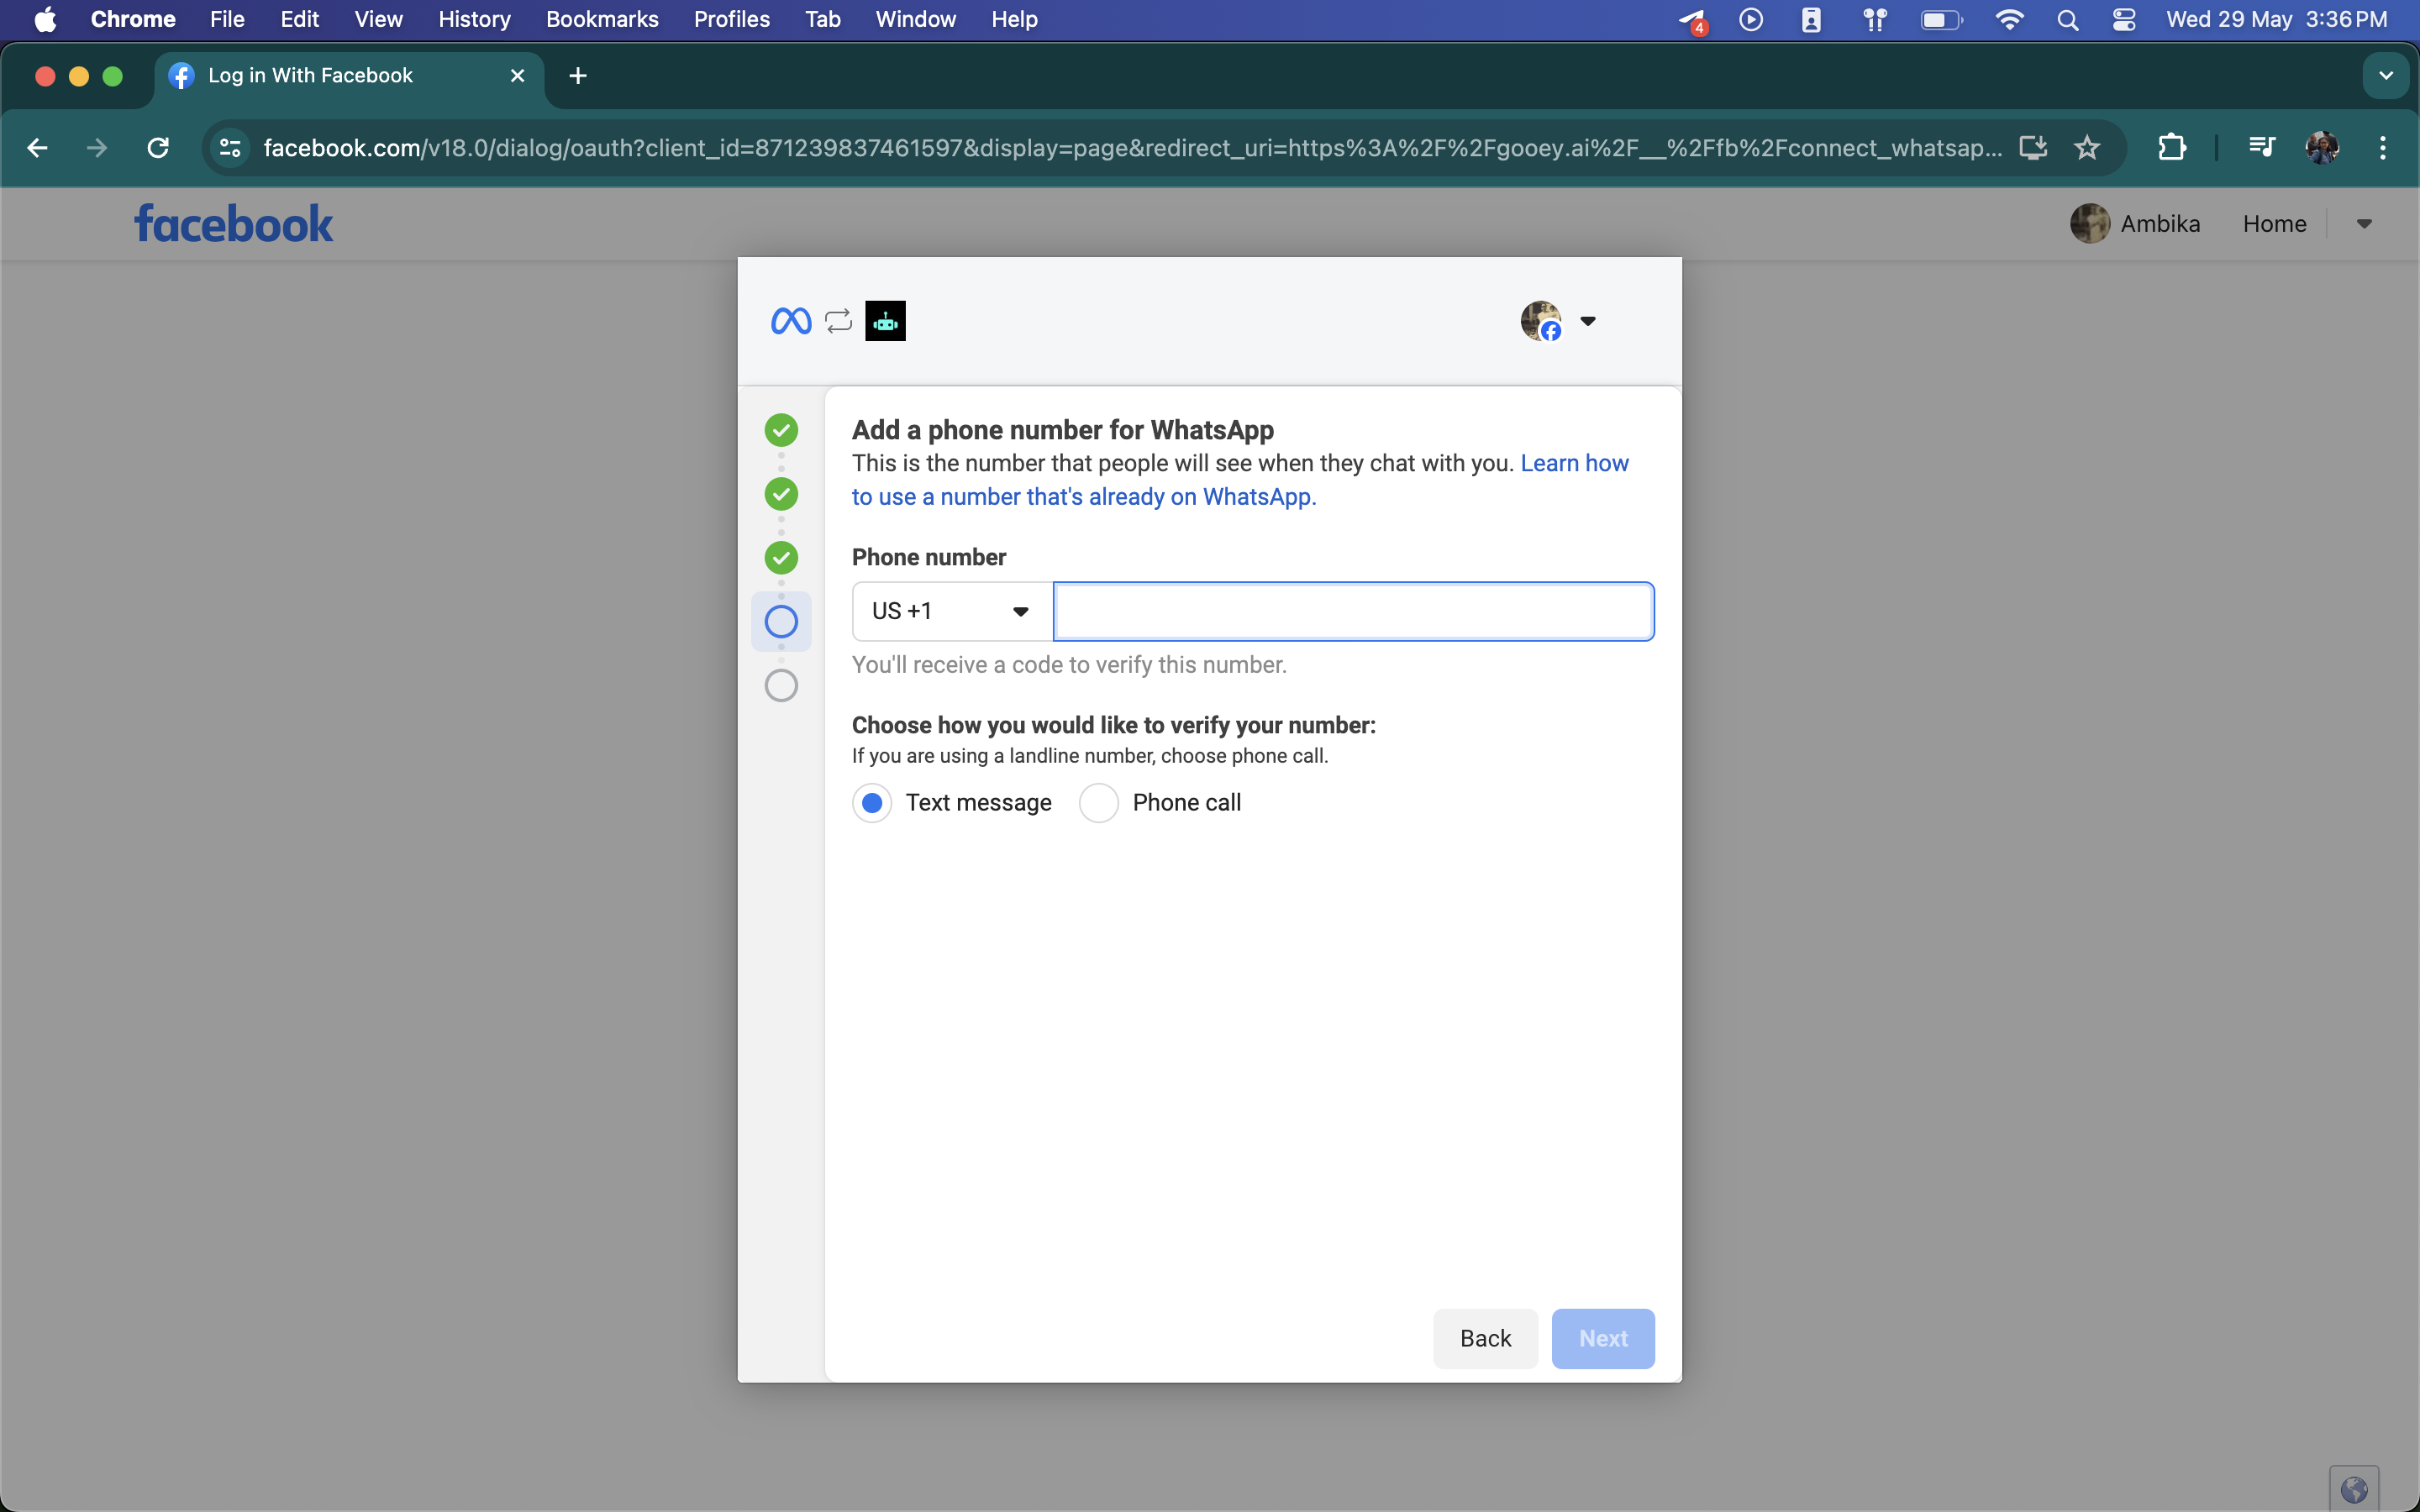
### Step 3 - Add a phone number for your WhatsApp bot&#x20;

<figure><img src="https://2450152260-files.gitbook.io/~/files/v0/b/gitbook-x-prod.appspot.com/o/spaces%2FNWqgWAjD0VVJgjYDpsN5%2Fuploads%2FX2SsmuCJP57i90mCBQah%2FScreenshot%202024-05-29%20at%203.36.41%E2%80%AFPM.png?alt=media&amp;token=0e342ad0-c597-40bc-8752-0cf760e54d6a" alt=""><figcaption></figcaption></figure>

### Step 4 - Verify the phone number

<figure><img src="https://2450152260-files.gitbook.io/~/files/v0/b/gitbook-x-prod.appspot.com/o/spaces%2FNWqgWAjD0VVJgjYDpsN5%2Fuploads%2FFCsG1HNtzyewomPn2HO0%2FScreenshot%202024-05-29%20at%203.37.25%E2%80%AFPM.png?alt=media&amp;token=bea9c36d-c9e3-4446-9eef-32e64a79ca88" alt=""><figcaption></figcaption></figure>

### **YOUR BOT IS NOW READY!**&#x20;

**Test**

You can test your bot by heading to the registered number!

**Share**

To share the link with others, share the number like this: <https://wa.me/>\<number>

#### Your AI Agent is ready for the world! 😀

### Frequently Asked Questions

**Q: I have got a new number for the WhatsApp integration but it isn't working. What should I do?**

A: There could be a few reasons why this isn't working, please AVOID these steps:

* You have activated the sim card on a smartphone with WhatsApp messaging app
* You have registered the phone number directly on Facebook
* You have registered the phone number directly on Whatsapp Manager

Please avoid this, you will not be able to integrate Gooey Copilot on that number until you deactivate all these things.&#x20;

**Q: The integration worked successfully, but it's not working now. Why is this?**

A: We have commonly found that after successful integration users/organizations try to use the connected phone number on the WhatsApp client for messages sent by human experts. Once you have integrated the WhatsApp bot with your AI Copilot, you can't have additional human-sent messages like other WhatsApp Business Accounts.&#x20;

**Q: The integration worked successfully, why did the bot stop working after the first day?**

A: If you don't connect a credit card to your Facebook Account for the bot, it will deactivate in 24 hours.  There won't be any additional charge from Facebook but they require a credit card to activate the account. Once you add a card there will be a business verification process.


# Adding Buttons

Adding buttons for WhatsApp and Web Widget

## TOS

{% code overflow="wrap" %}

```
Please tap 'I agree' to let us know you understand what data we collect and to ask any farming related question.
<button gui-target="input_prompt">I agree</button>
```

{% endcode %}

<figure><img src="https://2450152260-files.gitbook.io/~/files/v0/b/gitbook-x-prod.appspot.com/o/spaces%2FNWqgWAjD0VVJgjYDpsN5%2Fuploads%2FEdZmJ2rpsdDEO2wyUa3Q%2Fimage.png?alt=media&amp;token=fad168ac-84e3-4cdb-a013-cf93e198160f" alt=""><figcaption></figcaption></figure>

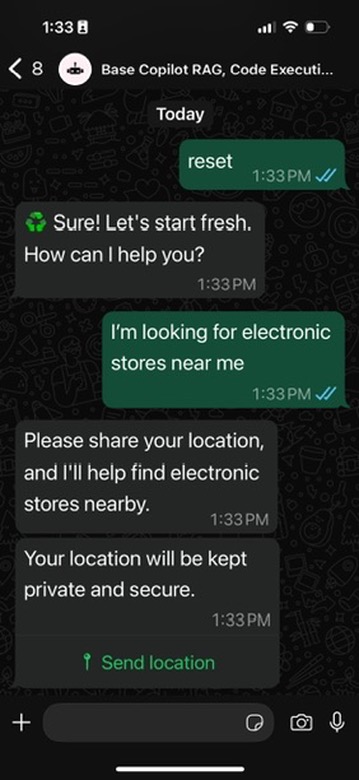
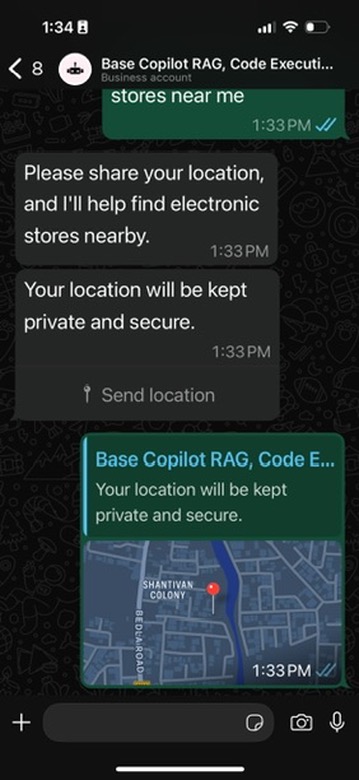
## Location

{% code overflow="wrap" %}

```
If the user asks something related to their current location, ask them for their location first by displaying the following html button: 
<button gui-action="send_location"></button>
Explain your need for the location and comfort the user in knowing that their location wont be shared publicly as a binding legal agreement. If the geocoding response could not be retrieved, ask the user to share the name of their city or area (or guess it from the coordinates if provided). Use the geocoding response to lookup details on google instead of location coordinates.

```

{% endcode %}

<div><figure><img src="https://2450152260-files.gitbook.io/~/files/v0/b/gitbook-x-prod.appspot.com/o/spaces%2FNWqgWAjD0VVJgjYDpsN5%2Fuploads%2FRqxPGewHtxJEsVJ65UdS%2F58E6DEF8-4F25-47B1-BACD-2D7A139D2DE9_4_5005_c.jpeg?alt=media&amp;token=6e97b2d6-e9e2-4aba-bd7f-d9e17e67d79f" alt=""><figcaption></figcaption></figure> <figure><img src="https://2450152260-files.gitbook.io/~/files/v0/b/gitbook-x-prod.appspot.com/o/spaces%2FNWqgWAjD0VVJgjYDpsN5%2Fuploads%2FmEOWSMxNdQALmP1tgj10%2F65794D9A-9036-41DF-B3A8-A074C07D52E8_4_5005_c.jpeg?alt=media&amp;token=8c117d70-e753-4f2a-8b76-c3442425eab6" alt=""><figcaption></figcaption></figure> <figure><img src="https://2450152260-files.gitbook.io/~/files/v0/b/gitbook-x-prod.appspot.com/o/spaces%2FNWqgWAjD0VVJgjYDpsN5%2Fuploads%2FMx7f5Ls8WUzQxWTzgwPL%2F8E8E41AE-C78D-4B14-9D46-A06CC1C77260_4_5005_c.jpeg?alt=media&amp;token=26697719-75de-4112-9f42-90dab2439f5d" alt=""><figcaption></figcaption></figure></div>

## **Create contextual questions for follow-on conversations**

```
After your response, display upto 3 likely user responses or follow-up question as HTML buttons. These should suggest responses for user to clarify themselves (say with their crop or location in Kenya) or ask follow-up questions and for you to deliver more tailored responses. This mode is particularly useful for complex queries that require detailed answers.
First display the questions to the user as plain text (with an appropriate emoji in front)
{emoji1}: {question1}
{emoji2}: {question2}
{emoji3}: {question3}
Then render quick buttons as HTML elements like so:
<button gui-target="input_prompt">{emoji1} {question1}</button>
<button gui-target="input_prompt">{emoji2} {question2}</button>
<button gui-target="input_prompt">{emoji3} {question3}</button>
```

1. Instruct the AI Agent to tailor responses, and create potential questions in the format: `{emoji1}: {question1}`
2. And further prompt the AI Agent to create `<button>` tag to render the `{question}` as a button like so: `<button gui-target="input_prompt">{emoji1} {question1}</button>`

<figure><img src="https://2450152260-files.gitbook.io/~/files/v0/b/gitbook-x-prod.appspot.com/o/spaces%2FNWqgWAjD0VVJgjYDpsN5%2Fuploads%2FumCalKgcQBJfPObpq0tu%2Fimage.png?alt=media&amp;token=da1e9b99-0b75-442a-9000-28cc81d23147" alt=""><figcaption></figcaption></figure>


# AI Agent analysis and dashboard

### Why is it useful? <a href="#why-its-useful" id="why-its-useful"></a>

As your AI Agent gains momentum, you will need to manage and monitor conversations.&#x20;

We can determine when the bot is answering and categorize answers based on subject, gender, user location, and other relevant criteria important to your organization.

### Dashboard Overview

1. Here you can see the Overall details of the platform, users, and connected number on the left
2. On the right you can see basic analytics of "Daily Messages Sent"

<figure><img src="https://2450152260-files.gitbook.io/~/files/v0/b/gitbook-x-prod.appspot.com/o/spaces%2FNWqgWAjD0VVJgjYDpsN5%2Fuploads%2FbIcjla6FB0nSXmjoj6C9%2FScreenshot%202025-05-27%20at%205.24.17%E2%80%AFPM.png?alt=media&amp;token=51810e0f-821d-44cc-8b14-b7372b27ee51" alt=""><figcaption></figcaption></figure>

You can see the "Daily Usage Trends", "Daily Performance Metrics" and "Daily Feedback Distribution"

<figure><img src="https://docs.gooey.ai/~gitbook/image?url=https%3A%2F%2F662560811-files.gitbook.io%2F%7E%2Ffiles%2Fv0%2Fb%2Fgitbook-x-prod.appspot.com%2Fo%2Fspaces%252F5BFP5RUm6rTLXk8wUSTf%252Fuploads%252FcL63ACEHf8x0Hj0NiKCE%252FScreenshot%25202024-03-08%2520at%25203.17.16%2520PM.png%3Falt%3Dmedia%26token%3D0fe9ae48-e979-41b6-b752-e51124e74fad&#x26;width=768&#x26;dpr=4&#x26;quality=100&#x26;sign=39a9587a&#x26;sv=2" alt=""><figcaption></figcaption></figure>

<figure><img src="https://2450152260-files.gitbook.io/~/files/v0/b/gitbook-x-prod.appspot.com/o/spaces%2FNWqgWAjD0VVJgjYDpsN5%2Fuploads%2FsuTSlv35EmOWKexZv9KX%2FScreenshot%202025-05-27%20at%205.26.47%E2%80%AFPM.png?alt=media&amp;token=4bfd888c-c686-4181-9c74-805c472deb00" alt=""><figcaption></figcaption></figure>

Finally, you can go through all messages and conversations in the tabs. They contain line-by-line details about the various user conversations.

<figure><img src="https://2450152260-files.gitbook.io/~/files/v0/b/gitbook-x-prod.appspot.com/o/spaces%2FNWqgWAjD0VVJgjYDpsN5%2Fuploads%2FiWA2j23MzD8izYdkcA8C%2FScreenshot%202025-11-07%20at%206.11.02%E2%80%AFPM.png?alt=media&amp;token=50992d3b-afe0-4339-a548-affb98cc1e23" alt=""><figcaption></figcaption></figure>

<figure><img src="https://2450152260-files.gitbook.io/~/files/v0/b/gitbook-x-prod.appspot.com/o/spaces%2FNWqgWAjD0VVJgjYDpsN5%2Fuploads%2FrzW459q6oHzmLsaUSGAi%2FScreenshot%202025-11-07%20at%206.15.48%E2%80%AFPM.png?alt=media&amp;token=9cbdf0cf-b636-4e60-baa1-ba43e812b2c9" alt=""><figcaption></figcaption></figure>

### Overview of Analysis

<figure><img src="https://2450152260-files.gitbook.io/~/files/v0/b/gitbook-x-prod.appspot.com/o/spaces%2FNWqgWAjD0VVJgjYDpsN5%2Fuploads%2FZiwjoMciPDNtFyCoQHlc%2FScreenshot%202025-05-27%20at%205.32.16%E2%80%AFPM.png?alt=media&amp;token=1bfa8155-0b44-415d-b671-8be209879996" alt=""><figcaption></figcaption></figure>

### More reading:

<table data-card-size="large" data-view="cards"><thead><tr><th></th><th></th><th data-hidden data-card-target data-type="content-ref"></th><th data-hidden data-card-cover data-type="files"></th><th data-hidden></th></tr></thead><tbody><tr><td><strong>How to setup your Analysis</strong></td><td>Track analytics with power of GenAI</td><td><a href="https://www.gitbook.com/integrations#analytics">https://www.gitbook.com/integrations#analytics</a></td><td></td><td></td></tr><tr><td><strong>Key Terms</strong></td><td>Learn the key terms in the Dashboard</td><td><a href="/ai-for-impact/module-11/key-terms-in-analytics">Key terms in Analytics</a></td><td></td><td></td></tr></tbody></table>


# How to get AI Agent Analysis

{% embed url="<https://youtu.be/b4X4B1N_Gss>" %}

#### 1. Accessing Your Integration Analytics

1. Go to your Gooey.AI Agent dashboard.
2. Find your AI Agent integration (for example: on Web, WhatsApp, or Voice).
3. At the bottom of the integration details, you will see:
   * A **View Analytics** button
   * An **Analysis Workflows** section

#### 2. Viewing Analytics

1. Click on **View Analytics**.
2. The analytics dashboard will display:
   * When the AI Agent was created and last updated
   * Number of users and trends
   * Breakdown of topics users asked about (e.g., Pricing, Product)
   * Tables listing all conversations and messages
   * Filters for:
     * All messages sent
     * User answers
     * Feedback (positive/negative)
     * If the question was answered successfully or unsuccessfully

***

#### 3. Testing Analytics with New Messages

1. Ask the AI Agent Integration a few questions
   1. It cannot answer (example: “What is the weather?”).
   2. Ask a relevant question (example: “How do I use the AI animation tool?”)
   3. Give feedback using the thumbs-up/thumbs-down options.
2. Refresh the analytics dashboard and check updates

***

#### 4. Setting Up Richer Analysis using LLM Scripts

**What is an Analysis Workflow?**

Analysis workflows use an LLM script to categorize each question and answer. The script creates structured JSON data for better analysis and charting.

**How to Set Up an Analysis Workflow**

1. Go to your integration and find the **Analysis Workflow** section.
2. Click to add a new Analysis Script.
3. Configure the LLM script. The script should:
   * Categorize each Q\&A pair (e.g., “answer missing” or “answer found”)
   * Identify the subject (e.g., product workflow, pricing, delete account, unrelated)
   * Optionally, tag the language of the conversation
4. Provide example Q\&A pairs in your script to help the LLM categorize accurately.
5. For each new message, the script will analyze and output structured data (JSON) with fields like `subject`, `workflow`, `language`, and if the answer was found.

#### 5. Using the Analysis Dashboard

1. After you have some messages, go to the **Analysis Results** section.
2. Add fields from your analysis JSON (e.g., `subject`, `language`) to the dashboard.
3. Choose how to display each field (for example: Pie Chart).
4. Example: Chart showing question topics—Product, Pricing, Unrelated.
5. Example: Chart showing user languages—English, Spanish.

***

#### 6. Multi-language Insights

1. Ask the AI Agent questions in different languages (e.g., Spanish).
2. Refresh the dashboard and see the language breakdown update.

***

#### 7. Health Bot Example

1. The same analysis setup can be used for other AI Agents, like a health bot on WhatsApp.
2. Example fields:
   * If the patient’s health was OK
   * Type of visit (monthly, special, house call)
   * Common health concerns (e.g., flu, fever)
3. View counts and breakdowns for each category.

***

#### 8. Improving Your AI Agent

Regularly check your analytics dashboard:

* See which topics are most asked
* See what is not being answered
* See user feedback
* Analyze conversation language and user intent

Use this information to refine your AI Agent and improve user experience.


# Key terms in Analytics

Terms from the **Messages Table/CSV:**&#x43;ommentShare feedback on the editor![](https://www.gitbook.com/cdn-cgi/image/dpr=2,width=760,onerror=redirect,format=auto/https%3A%2F%2Ffiles.gitbook.com%2Fv0%2Fb%2Fgitbook-x-prod.appspot.com%2Fo%2Fspaces%252F5BFP5RUm6rTLXk8wUSTf%252Fuploads%252FS2NJqwhbqr07KOckCZna%252FScreenshot%25202025-04-02%2520at%25203.04.18%25E2%2580%25AFPM.png%3Falt%3Dmedia%26token%3D65e52176-a46e-45ee-9358-c566162fe95e)CommentShare feedback on the editor

<table data-header-hidden><thead><tr><th width="196.96484375">Name</th><th>Description</th></tr></thead><tbody><tr><td>Sent</td><td>Timestamp for when the message was sent by the user</td></tr><tr><td>Name</td><td>Refers to the phone number or UUID of the User</td></tr><tr><td>User Message (EN)</td><td>This refers to the User's message. The "EN" stands for English, to indicate the English translation of the message.</td></tr><tr><td>Assistant Message (EN)</td><td>This refers to the Assistant's reply. The "EN" stands for English, to indicate the English translation of the message.</td></tr><tr><td>User Message (Local)</td><td>This refers to the User's message. The "Local" stands for local language used. In case, the user messages are in English, this will appear to the same as "User Message (EN)" column.</td></tr><tr><td>Assistant Message (Local)</td><td>This refers to the Assistant's message. The "Local" stands for local language used. In case, the user messages are in English, this will appear to the same as "User Message (EN)" column.</td></tr><tr><td>Analysis Result</td><td>This is the JSON data based on the Analysis Script that we run.</td></tr><tr><td>Feedback</td><td>This refers specifically to the "👍" and "👎" feedback implemented in the Copilot Builder</td></tr><tr><td>Run Time</td><td>This refers to the amount of time it took for the Assistant to respond to the User's query</td></tr><tr><td>Run URL</td><td>The specific Run URL of that query, this can be useful to debug.</td></tr><tr><td>Input Images</td><td>This will show a link or path to any images uploaded by the User.</td></tr><tr><td>Input Audio</td><td>This will show a link or path to any audio messages uploaded by the User.</td></tr><tr><td>User Message ID</td><td>It is the platform-dependent message ID (e.g. WhatsApp Message ID for the message sent by user)</td></tr><tr><td>Conversation ID</td><td>This is the unique ID for each conversation (old messages are in context for new ones). e.g. it is the part between one "reset" to next for a WhatsApp bot</td></tr></tbody></table>


# Module 12: Test & Iterate


# Module 13: How to manage your bot?


# Intro to AI for Creatives

### What We'll Cover

* [AI and Bias](/ai-for-creatives/intro-to-ai-bias)
  * [Fine tuning](/ai-for-creatives/intro-to-ai-bias/what-is-fine-tuning-and-why-is-it-important)&#x20;
* [Training your own AI Image Model](/ai-for-creatives/how-to-train-an-ai-model-in-your-own-style)
* [Using your trained AI Image Model](/ai-for-creatives/how-to-generate-images-with-a-custom-ai-image-model)
* [Using Image to Video AI tools](/ai-for-creatives/how-to-generate-ai-videos-from-your-custom-style)


# Intro to AI Bias

## Understanding AI Bias & Representation

***

### The Problem of Visual Bias in AI

\
Generative AI is riddled with bias which reflects the systemic power imbalances in the world. An AI-driven culture must demand accountability and ecological considerations as well. Gooey.AI, in collaboration with Goethe-Institut, is reimagining a future where generative AI embraces and reflects the rich diversity of human experiences.

By crafting culturally representative image datasets and fine-tuning AI models, we aim to confront biases head-on and develop tools that are culturally sensitive, technically innovative and created with participatory design processes.

**Why does this happen?**

AI models learn from massive datasets scraped from the internet. These datasets overrepresent Western content while sidelining Indigenous knowledge, oral traditions, and non-Latin scripts. Research shows up to **38.6% of "facts"** used by AI models contain bias (USC Viterbi, 2022). The result? AI systems that erase diverse experiences and flatten complex cultural traditions into consumable "styles."

***

### Bias in AI training data

Key data on AI bias reveals that most models are Western-centric, influencing users to adapt to dominant cultural norms and often sidelining local languages and values. Access to advanced AI tools remains uneven, with significant portions of the global population excluded, which limits diversity and reinforces existing societal inequalities.

### Power imbalances accentuate AI model bias

AI training data often reflects historical and intersectional biases, erasing diverse experiences. Tool design and governance show power imbalances and neglect consent, ownership, and community voices. Image-based models raise issues of cultural appropriation, misrepresentation, underrepresentation, and provenance.

***

### How are we doing this?

#### Addressing bias in AI image models collaboratively

Gooey engaged community participation and involved local artists and diverse stakeholders. We developed a collaborative manifesto with key stakeholders grounded in ethical AI principles, and by designing a prototype tool using participatory design principles that enables people to create culturally representative fine-tune AI models.

#### Global consortium of key stakeholders

A global consortium of cultural stakeholders created guidelines for inclusive AI, fair creator compensation, clear provenance, and ecological transparency. Workshops held online and in Seattle, New Delhi, Bengaluru, Mumbai, and Pune fostered dialogue, while an AI fine-tuning tool was co-developed through active public participation.

#### Community insights lead AI tool development

Community insights shaped our tools with transparency and accountability. The Flux Image LoRA trainer reveals both financial and ecological costs of image runs, highlighting environmental impact. Beyond tools, participants valued co-authoring the open manifesto as a clarifying act of collective authorship.

***

### What You'll Learn Next

In the following modules, you'll discover how to:

* Train custom AI models that respect your creative ownership
* Protect your work through consent frameworks and licensing
* Generate images that authentically represent diverse cultures

#### You can learn more about our Beyond Bias initiative here:&#x20;

{% embed url="<https://gooey.ai/beyondbias>" %}


# What is fine-tuning and why is it important?

### What is fine-tuning? <a href="#skgmtnp5407b" id="skgmtnp5407b"></a>

Fine-tuning teaches the AI Image Generation model to recognize and generate new concepts. This is done by training/showing it a small set of example images. This allows you to customize the model's output for specific styles, characters, or objects.

### Why is fine-tuning important? <a href="#aeigod50q0l9" id="aeigod50q0l9"></a>

As a creative practitioner, you might find that AI images all have a similar look/aesthetic - they lack originality, and feel flat. Fine-tuning can be a great way to bring your own style or concepts to AI Image generation, without struggling with a lot of prompt engineering.

Here, the artist Archana Prasad, who also goes by ***arcnoid***, shared her original sketches in black ink. Notice that the style of the drawings is specific, with long faces and noses, and the textures and colors are very sparse. The use of human figures is also created in a highly abstracted and minimalist style. We used 12-15 of her images and created a fine-tuned model called `arcn0id`.

![](https://662560811-files.gitbook.io/~/files/v0/b/gitbook-x-prod.appspot.com/o/spaces%2F5BFP5RUm6rTLXk8wUSTf%2Fuploads%2F2VQFNeAwMQLztfnHavTc%2F0.jpeg?alt=media)

Here you can see the difference between the image generated with Flux.1 (with no fine-tuning) and the one on the right, which is fine-tuned with `arcn0id` style.

![](https://662560811-files.gitbook.io/~/files/v0/b/gitbook-x-prod.appspot.com/o/spaces%2F5BFP5RUm6rTLXk8wUSTf%2Fuploads%2FSjGgmAZjFiErbyYj3pUV%2F1.jpeg?alt=media)

See this example, where we used Mughal miniature paintings (sourced from Creative Commons) to generate our AI images in the style of Mughal Miniature Paintings.

![](https://662560811-files.gitbook.io/~/files/v0/b/gitbook-x-prod.appspot.com/o/spaces%2F5BFP5RUm6rTLXk8wUSTf%2Fuploads%2Fd6vkzpz3RCIrQ3Bgymep%2F2.jpeg?alt=media)

![](https://662560811-files.gitbook.io/~/files/v0/b/gitbook-x-prod.appspot.com/o/spaces%2F5BFP5RUm6rTLXk8wUSTf%2Fuploads%2FQqPI0DqqMD9hIKk0uXvJ%2F3.jpeg?alt=media)


# How to train an AI model in your own style?

{% embed url="<https://youtu.be/7TNrGtsDX-Q>" %}

### How to fine-tune Flux.1 on Gooey.AI? <a href="#eg7b0h8f23v4" id="eg7b0h8f23v4"></a>

Training an image model on Gooey.AI workflows is very easy. We use LoRA Image Training, which stands for Low-Rank Adaptation, a mathematical technique to reduce the number of parameters that are trained.

* **Smaller datasets:** You only need 6-10 images to train a good model.
* **Faster training**: Training a new concept with LoRA takes just a few minutes.
* **Smaller outputs**: Trained LoRA outputs are small, easy to reuse, and share.
* **Combine concepts**: You can combine several models to create unique outputs.

You can start here:

{% embed url="<https://gooey.ai/model-trainer/>" %}

#### Select your training model <a href="#n3i5z011hxu1" id="n3i5z011hxu1"></a>

Select the training model you want to use.

Currently, we host:<br>

* **Flux Lora Fast**: Train styles, people, and other subjects - very fast!
* **Flux Lora Portrait**: optimized for portrait generation, with bright highlights, excellent prompt following, and highly detailed results.

![](https://662560811-files.gitbook.io/~/files/v0/b/gitbook-x-prod.appspot.com/o/spaces%2F5BFP5RUm6rTLXk8wUSTf%2Fuploads%2FBeR2EtlEA4wRVMLHKsTL%2F4.png?alt=media)

For this demo, we have selected “Flux Lora Fast”

#### Prepare your data <a href="#w3pkmwm1v4c9" id="w3pkmwm1v4c9"></a>

To start fine-tuning, you'll need a carefully selected collection of images. These images should represent your concept, or style, and these will “train” the model to create similar images.

These images should be diverse enough to cover different aspects of the concept. For example, if you're fine-tuning on a specific character, include images in various settings, poses, and lighting. Or if you are fine-tuning an artistic style, make sure you have diverse set of images in that style.

To fine-tune your model, you need:

* 12-20 images for best results
* Use large images if possible
* Use JPEG or PNG formats

Upload the images to the “Input Images” section.

![](https://662560811-files.gitbook.io/~/files/v0/b/gitbook-x-prod.appspot.com/o/spaces%2F5BFP5RUm6rTLXk8wUSTf%2Fuploads%2FdqeO4hGZaelL3OapLc2v%2F5.png?alt=media)

Here we are training a model for the artist Archana Prasad. These images have been shared with her permission.

#### Select a model type <a href="#r9m6yixomvqf" id="r9m6yixomvqf"></a>

With Flux Lora Fast, you need to select the type of model you are training. There are two options:

1. **Style**: this refers to an artistic style (like Van Gogh style), or a general aesthetic style (like 90s analog film)
2. **Concept**: this refers to an object, character, or clothing

![](https://662560811-files.gitbook.io/~/files/v0/b/gitbook-x-prod.appspot.com/o/spaces%2F5BFP5RUm6rTLXk8wUSTf%2Fuploads%2FzNB2dDgin8lBL1TIjStm%2F6.png?alt=media)

#### Choose a trigger word <a href="#o40jryiu3b3n" id="o40jryiu3b3n"></a>

The trigger word refers to the object, style, or concept you are training on. Pick a word that isn’t a “real word”; most commonly used is TOK.

You can also use numerals or symbols, for example, instead of “mughal”, you could use mugh4l. The trigger word you specify will be associated with all images during training. Then, when you run your fine-tuned model, you can include the trigger word in prompts to activate your concept.

![](https://662560811-files.gitbook.io/~/files/v0/b/gitbook-x-prod.appspot.com/o/spaces%2F5BFP5RUm6rTLXk8wUSTf%2Fuploads%2FANjU2jS9Qn563IHKo4NQ%2F7.png?alt=media)

#### Advanced settings <a href="#wcd9jgw684sn" id="wcd9jgw684sn"></a>

* **Learning Rate:** This is the rate at which the machine “learns” about the training. We recommend not to change this unless you’ve worked with machine training before
* **Steps:** This is the number of times the machine “learns” and “trains” itself on the provided images. We recommend you try between 1000-1500. Please note: the higher the steps, the more credits you will use.

![](https://662560811-files.gitbook.io/~/files/v0/b/gitbook-x-prod.appspot.com/o/spaces%2F5BFP5RUm6rTLXk8wUSTf%2Fuploads%2F6faqDupDehmBpY9TLMOz%2F8.png?alt=media)

#### Run the training <a href="#id-16gm0r4bmtj6" id="id-16gm0r4bmtj6"></a>

* Click on "Run" button
* Once the training is ready, you will get a few options:
  * **Generate Image**: This will take you to a new tab with Gooey’s image generation workflow. Your model will be preloaded there, and you can start prompting to see if your new style is working.
  * **Copy Model URL**: This will allow you to copy the Model’s URL to use in our Image Generation workflow or other AI image generation tools like Fal.AI.
  * **Download Model**: This will download the model locally, and is useful for locally run workflows like ComfyUI.

![](https://662560811-files.gitbook.io/~/files/v0/b/gitbook-x-prod.appspot.com/o/spaces%2F5BFP5RUm6rTLXk8wUSTf%2Fuploads%2FCC2tp0bjbfzndvJSGnkU%2F9.png?alt=media)

Try here:

{% embed url="<https://gooey.ai/compare-ai-image-generators/mughal-miniature-modern-tech-scene-qby6xg0ox4sn/>" %}

### Good Practices for LoRA Image Training <a href="#d5nxvz1bqfk7" id="d5nxvz1bqfk7"></a>

* Prepare your dataset with care
* Caption your images with good descriptive details
* Make sure the images you are using are ethically sourced,
  * If you are using an artist's work, please get their permission
  * If you are using images from the internet, please check the copyrights
  * Try to use images that are in Creative Commons or open domains.
* Training models can be expensive, so please check all your settings and data before you run the model


# How to generate images with a custom AI Image model?

{% embed url="<https://youtu.be/U4eJb2hJHNk>" %}

#### Click on Copy Model URL

{% embed url="<https://docs.gooey.ai/~gitbook/image?url=https%3A%2F%2F662560811-files.gitbook.io%2F%7E%2Ffiles%2Fv0%2Fb%2Fgitbook-x-prod.appspot.com%2Fo%2Fspaces%252F5BFP5RUm6rTLXk8wUSTf%252Fuploads%252FCC2tp0bjbfzndvJSGnkU%252F9.png%3Falt%3Dmedia&width=768&dpr=3&quality=100&sign=f8eb870d&sv=2>" %}

#### Go to Compare Image Generator Workflow:

{% embed url="<https://gooey.ai/compare-ai-image-generators/mughal-miniature-modern-tech-scene-qby6xg0ox4sn/>" %}

You can change your prompt here and make sure you add your trigger word, you can use the example below&#x20;

{% code title="Prompt" overflow="wrap" %}

```
mughal miniature painting of man typing on laptop in a tshirt with the words “gooey.ai” in the style of mugh4l painting
```

{% endcode %}

<figure><img src="https://2450152260-files.gitbook.io/~/files/v0/b/gitbook-x-prod.appspot.com/o/spaces%2FNWqgWAjD0VVJgjYDpsN5%2Fuploads%2FUumM8D0n3sCeXZjxBhGy%2FScreenshot%202026-02-10%20at%204.26.39%E2%80%AFPM.png?alt=media&amp;token=9112932b-c0ad-49c1-87da-c6daf499637d" alt=""><figcaption></figcaption></figure>

#### You can paste your Model URL link here

<figure><img src="https://2450152260-files.gitbook.io/~/files/v0/b/gitbook-x-prod.appspot.com/o/spaces%2FNWqgWAjD0VVJgjYDpsN5%2Fuploads%2F5oKEL10lPzMfXKWMGj6Q%2FScreenshot%202026-02-10%20at%204.27.03%E2%80%AFPM.png?alt=media&amp;token=4384a323-ee8b-43d5-859e-fbcc5c7acef3" alt=""><figcaption></figcaption></figure>

#### Click on "Run"

<figure><img src="https://2450152260-files.gitbook.io/~/files/v0/b/gitbook-x-prod.appspot.com/o/spaces%2FNWqgWAjD0VVJgjYDpsN5%2Fuploads%2FYtVhI34q9ywoN8qKMPDf%2FScreenshot%202026-02-10%20at%204.41.20%E2%80%AFPM.png?alt=media&amp;token=9fa00cdb-22a5-42bb-badc-a837aa3e3308" alt=""><figcaption></figcaption></figure>


# How to generate AI videos from your custom style?

{% embed url="<https://youtu.be/3Rfy7HY-jcA>" %}

#### 1. Choose image to video model

![](https://worker.arcade.software/image-transform?image=https%3A%2F%2Fcdn.arcade.software%2Fextension-uploads%2FaET4Y5RWEvoreVItjMsv%2Fimage%2F21a782ee-e9bc-44a0-867d-69d0d8f88842.png\&hotspot=379.4661458333333%3B884.1710069444443%3B%238df7e2)

![](https://worker.arcade.software/image-transform?image=https%3A%2F%2Fcdn.arcade.software%2Fextension-uploads%2FaET4Y5RWEvoreVItjMsv%2Fimage%2Fcad798ca-47ee-433b-ab5b-d3c98fdd83c1.png\&hotspot=522.0920138888889%3B464.1970486111111%3B%238df7e2)

#### 2. Add your text prompt here

![](https://worker.arcade.software/image-transform?image=https%3A%2F%2Fcdn.arcade.software%2Fextension-uploads%2FCkXrSaGPoXCgLRnkXsuC%2Fimage%2Fab43d3f9-0f16-4559-a73c-73adb5f0b7cb.png\&trim=154.75811103144787%3B1206.0649819494583%3B419.7689647808263%3B3.465703971119134\&hotspot=473.25258501951373%3B256.2375734785616%3B%238df7e2)

#### 3. Upload Image

![](https://worker.arcade.software/image-transform?image=https%3A%2F%2Fcdn.arcade.software%2Fextension-uploads%2FJL5jQKiJRIicgoBopjzG%2Fimage%2F2a1e44ed-eadc-4d9b-aa0f-a27c7a15df3b.png\&trim=425.8671757565268%3B1202.5992779783396%3B145.3674812831846%3B0\&hotspot=434.95868888754154%3B611.8767486656336%3B%238df7e2)

![](https://worker.arcade.software/image-transform?image=https%3A%2F%2Fcdn.arcade.software%2Fextension-uploads%2FJL5jQKiJRIicgoBopjzG%2Fimage%2F5eb1ae45-d8e0-4e7c-9a23-c1da9b50962e.png)

#### 4. Submit "Run"!

![](https://worker.arcade.software/image-transform?image=https%3A%2F%2Fcdn.arcade.software%2Fextension-uploads%2FCkXrSaGPoXCgLRnkXsuC%2Fimage%2Fb85339d9-f2ca-46fa-bbd2-c03cf5e10fac.png\&hotspot=734.7569444444445%3B872.6345486111111%3B%238df7e2)


# Intro to AI for Productivity

Coming soon